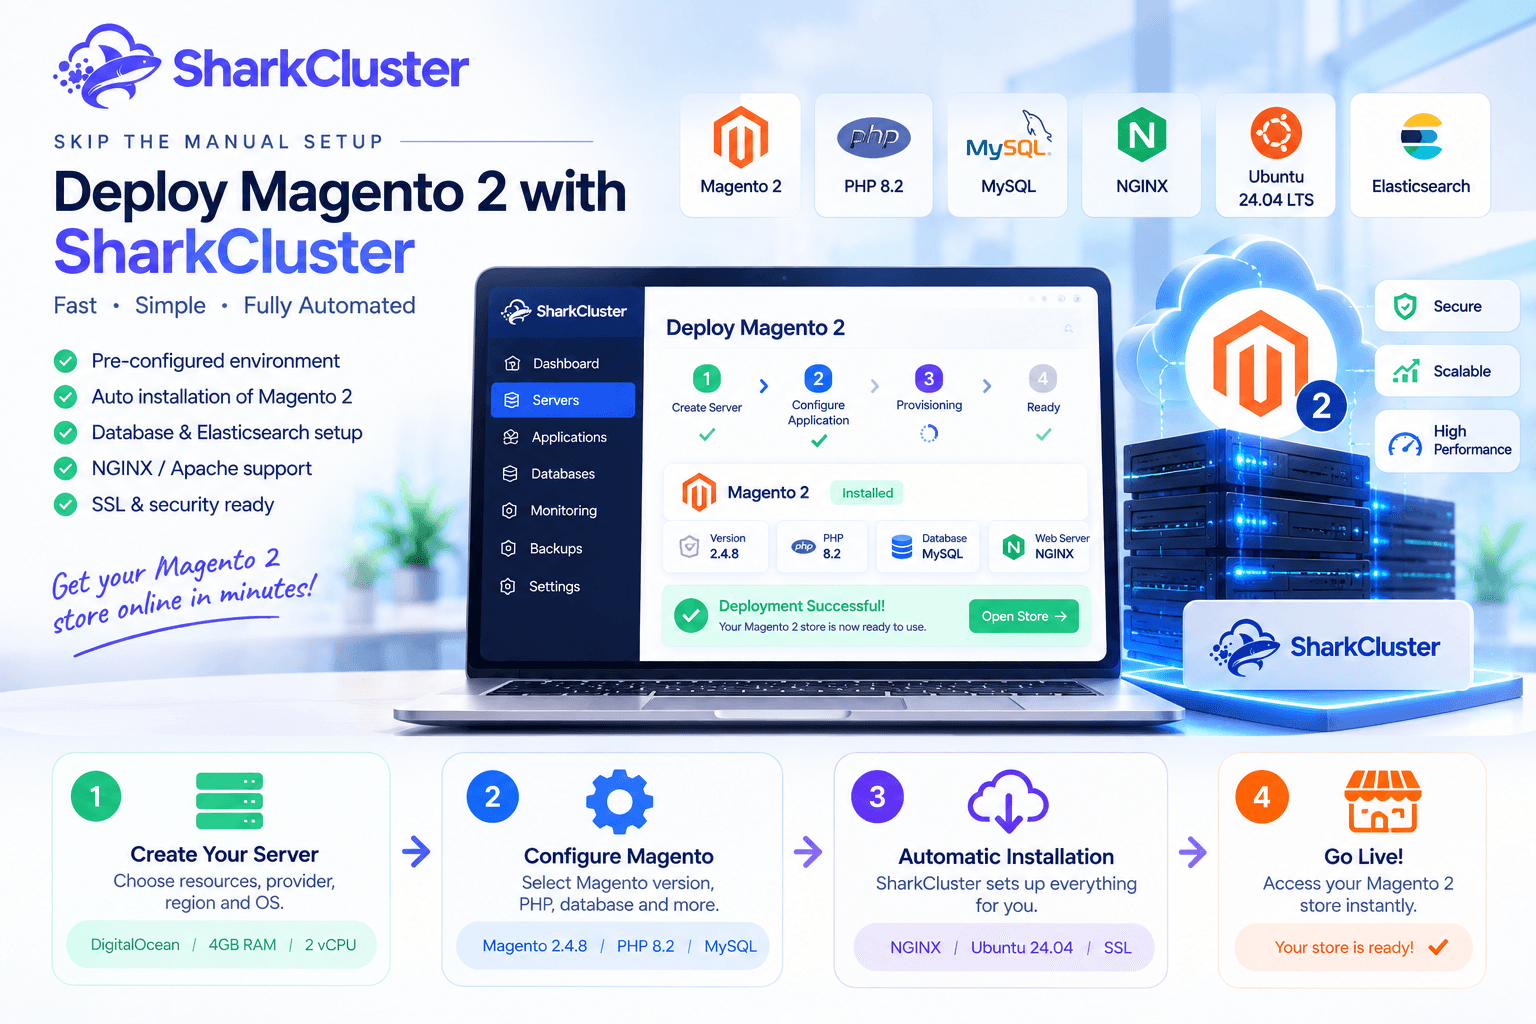

Before you can even open the store, you have to deploy Magento 2 in a number of steps: setting up a server, installing the operating system, configuring PHP, setting up MySQL or MariaDB, configuring NGINX or Apache, installing the dependencies for Magento, configuring Elasticsearch, and finally deploying the application.
That setup can take a long time for developers and store owners, especially if everything has to be set up manually.
With SharkCluster, the process is much simpler. You can select a Magento 2 server from the dashboard, deploy the server, configure the PHP version and Magento version, and select your preferred infrastructure options. SharkCluster installs the necessary Magento components, including Elasticsearch, automatically and takes care of the underlying server configuration.
From selecting a server to opening the newly installed Magento 2 store, this guide walks you through the entire process depicted in the image.
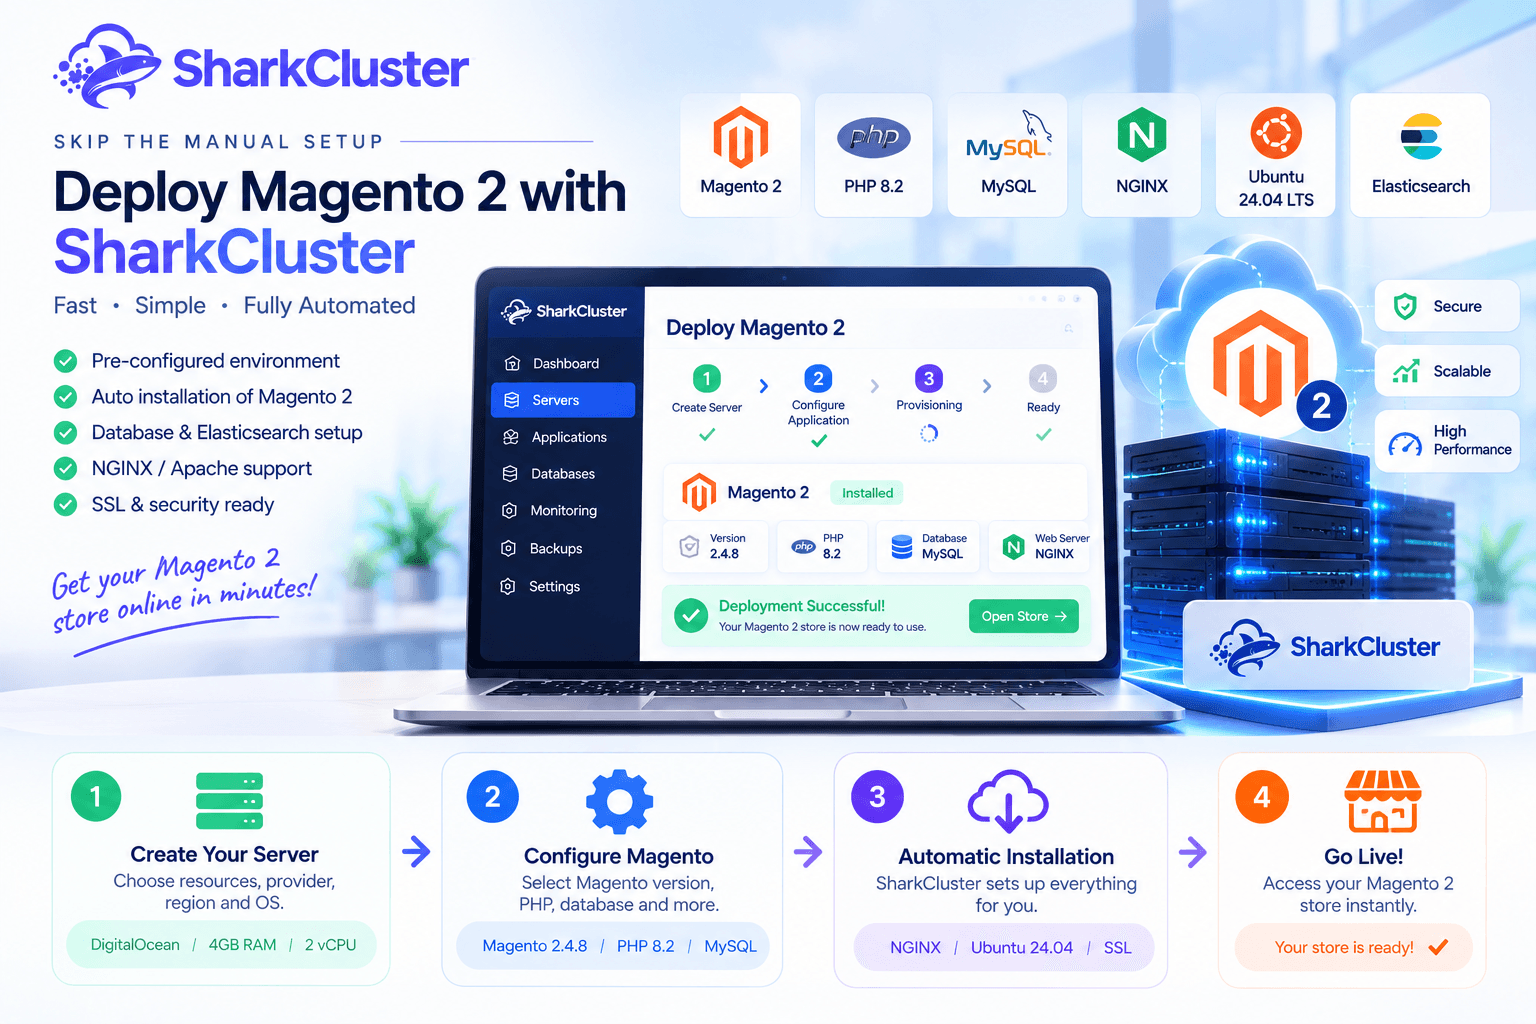
Why deploy Magento 2 with SharkCluster?
Despite its robust eCommerce platform, Magento 2 requires more infrastructure than a standard PHP application.
A production-ready Magento environment typically requires:
- A properly configured Linux server
- PHP and the required PHP extensions
- MySQL or MariaDB
- NGINX or Apache
- Composer and other required tools
- Elasticsearch
- Correct file and directory permissions
- Magento-specific server configuration
- SSL and domain configuration for production
Setting these up manually can introduce unnecessary complexity.
These steps are integrated into a guided deployment workflow with SharkCluster. You can choose the infrastructure from the dashboard and let the platform set up the server, rather than starting with a blank VPS and configuring everything through SSH.
The end result is a significantly faster process for selecting a server and deploying a functional Magento 2 application.
Step 1: Create Your Magento 2 Server
Creating a server from the SharkCluster dashboard is the first step.
Select the resources required for your Magento deployment from the Servers section.
You can select options like:
- RAM
- vCPU
- Storage type
- Cloud provider
- Server region
- Application type
- Magento version
- PHP version
- Database
- Web server
- Ubuntu version
- SSH key
- Backup configuration
- Server monitoring
Your anticipated traffic, catalog size, extensions, and background jobs should all play a role in determining the server size you select for Magento 2.
The selected infrastructure includes a DigitalOcean server with 4 GB of RAM, 2 vCPUs, and SSD storage in the illustration below.
The dashboard also allows you to compare available server plans and locations before deployment.
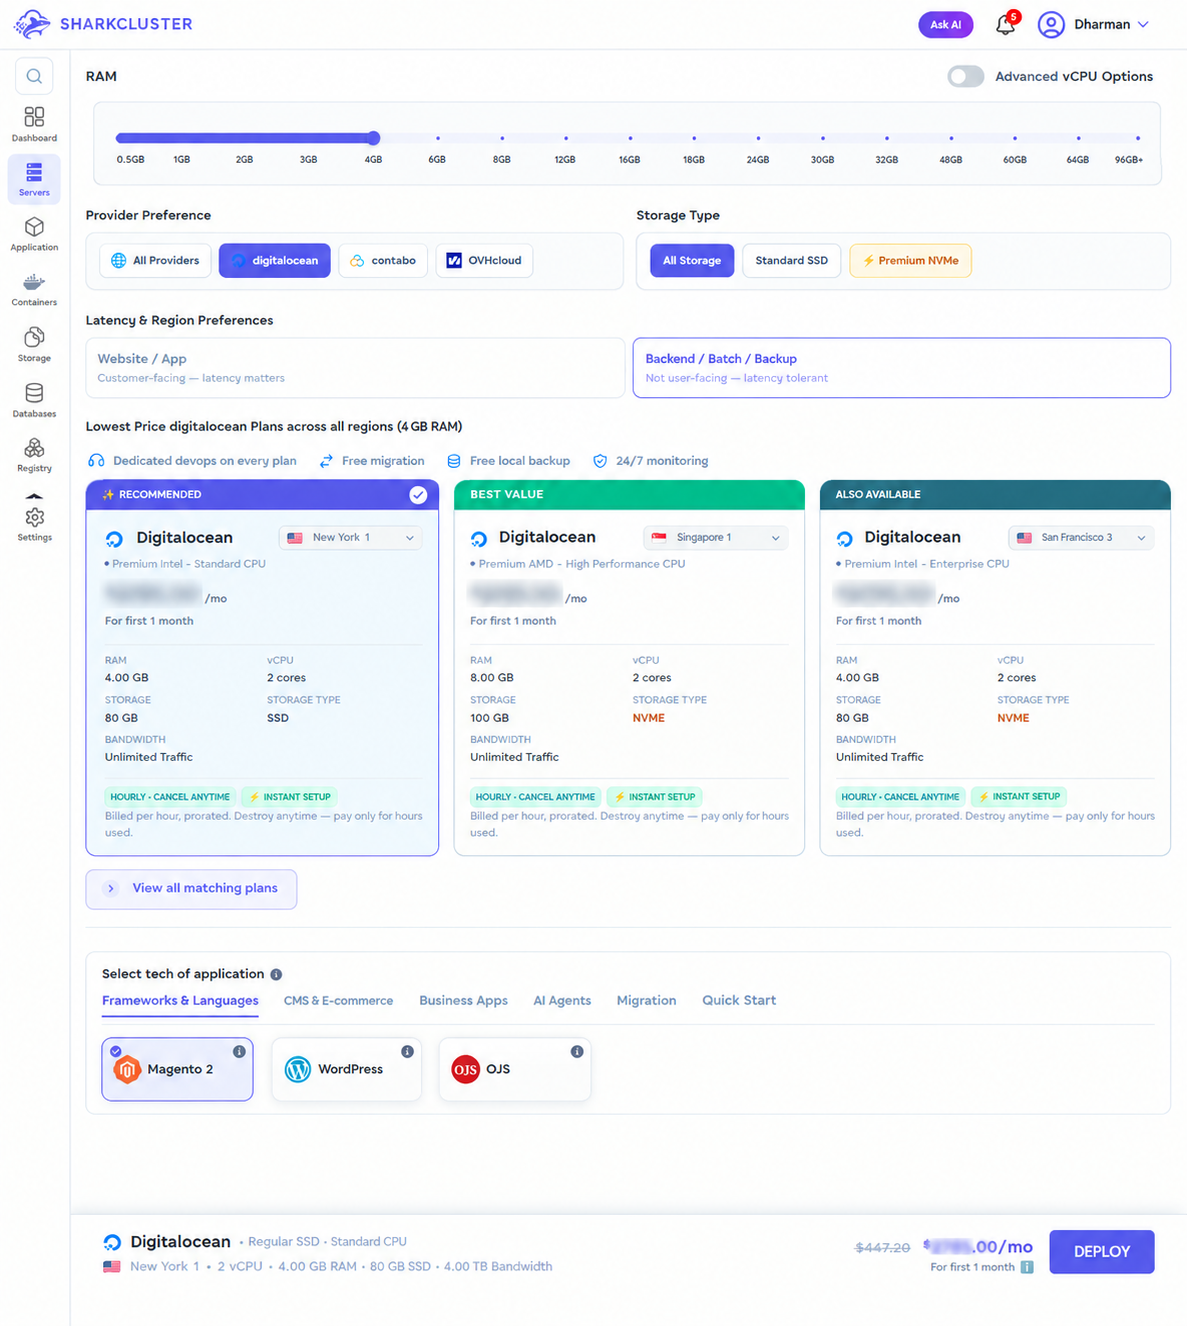
Because you don't have to manually set up a virtual private server (VPS) and then start setting up the Magento environment from scratch, the initial server setup is much simpler.
Step 2: Install the server and configure Magento 2.
SharkCluster takes you to the Application & Server Details screen after you select your server.
Configuring the actual Magento environment takes place here.
You can choose the Magento configuration you want to deploy by providing a server name and an application name.
Select Your Magento Version
SharkCluster provides multiple Magento 2 versions to choose from.
The deployment screen shown in the example includes options such as:
- Magento 2.4.9
- Magento 2.4.8
- Magento 2.4.7
- Magento 2.4.6
- Magento 2.4.5
- Magento 2.4.4
If you select the appropriate version, you will be able to begin with the Magento release that your project requires.
Select PHP
You can also select the PHP version supported by your Magento deployment.
In the example, PHP 8.2 is recommended, while PHP 8.1 is also available.
Choose Your Database
The deployment screen provides database options including:
- MySQL
- MariaDB
This means you can choose the database technology that matches your Magento project requirements without manually installing it after creating the server.
Choose How to Deploy Magento
SharkCluster provides different application setup options:
Fresh Installation
Start from scratch with a brand-new Magento project.
Use the Git Repo to deploy
Deploy an existing Magento project from a Git repository.
Upload ZIP
As a ZIP file, upload an existing Magento application.
For a new store, Fresh Installation is the simplest option.
Select Ubuntu and a Web Server — format this as a proper heading if it introduces a step.
You can also choose the version of Ubuntu and web server on the setup screen.
For example, the deployment configuration shown uses:
- Ubuntu 24.04 LTS
- NGINX
If your application requires it, you can pick Apache instead.
Configure SSH Access
Finally, choose whether to use an existing SSH key, add a public key, or generate a new key.
You can use this to protect server access after the deployment without having to manually set up SSH authentication.
Review the summary on the right side of the screen and click Request Server after everything has been configured.
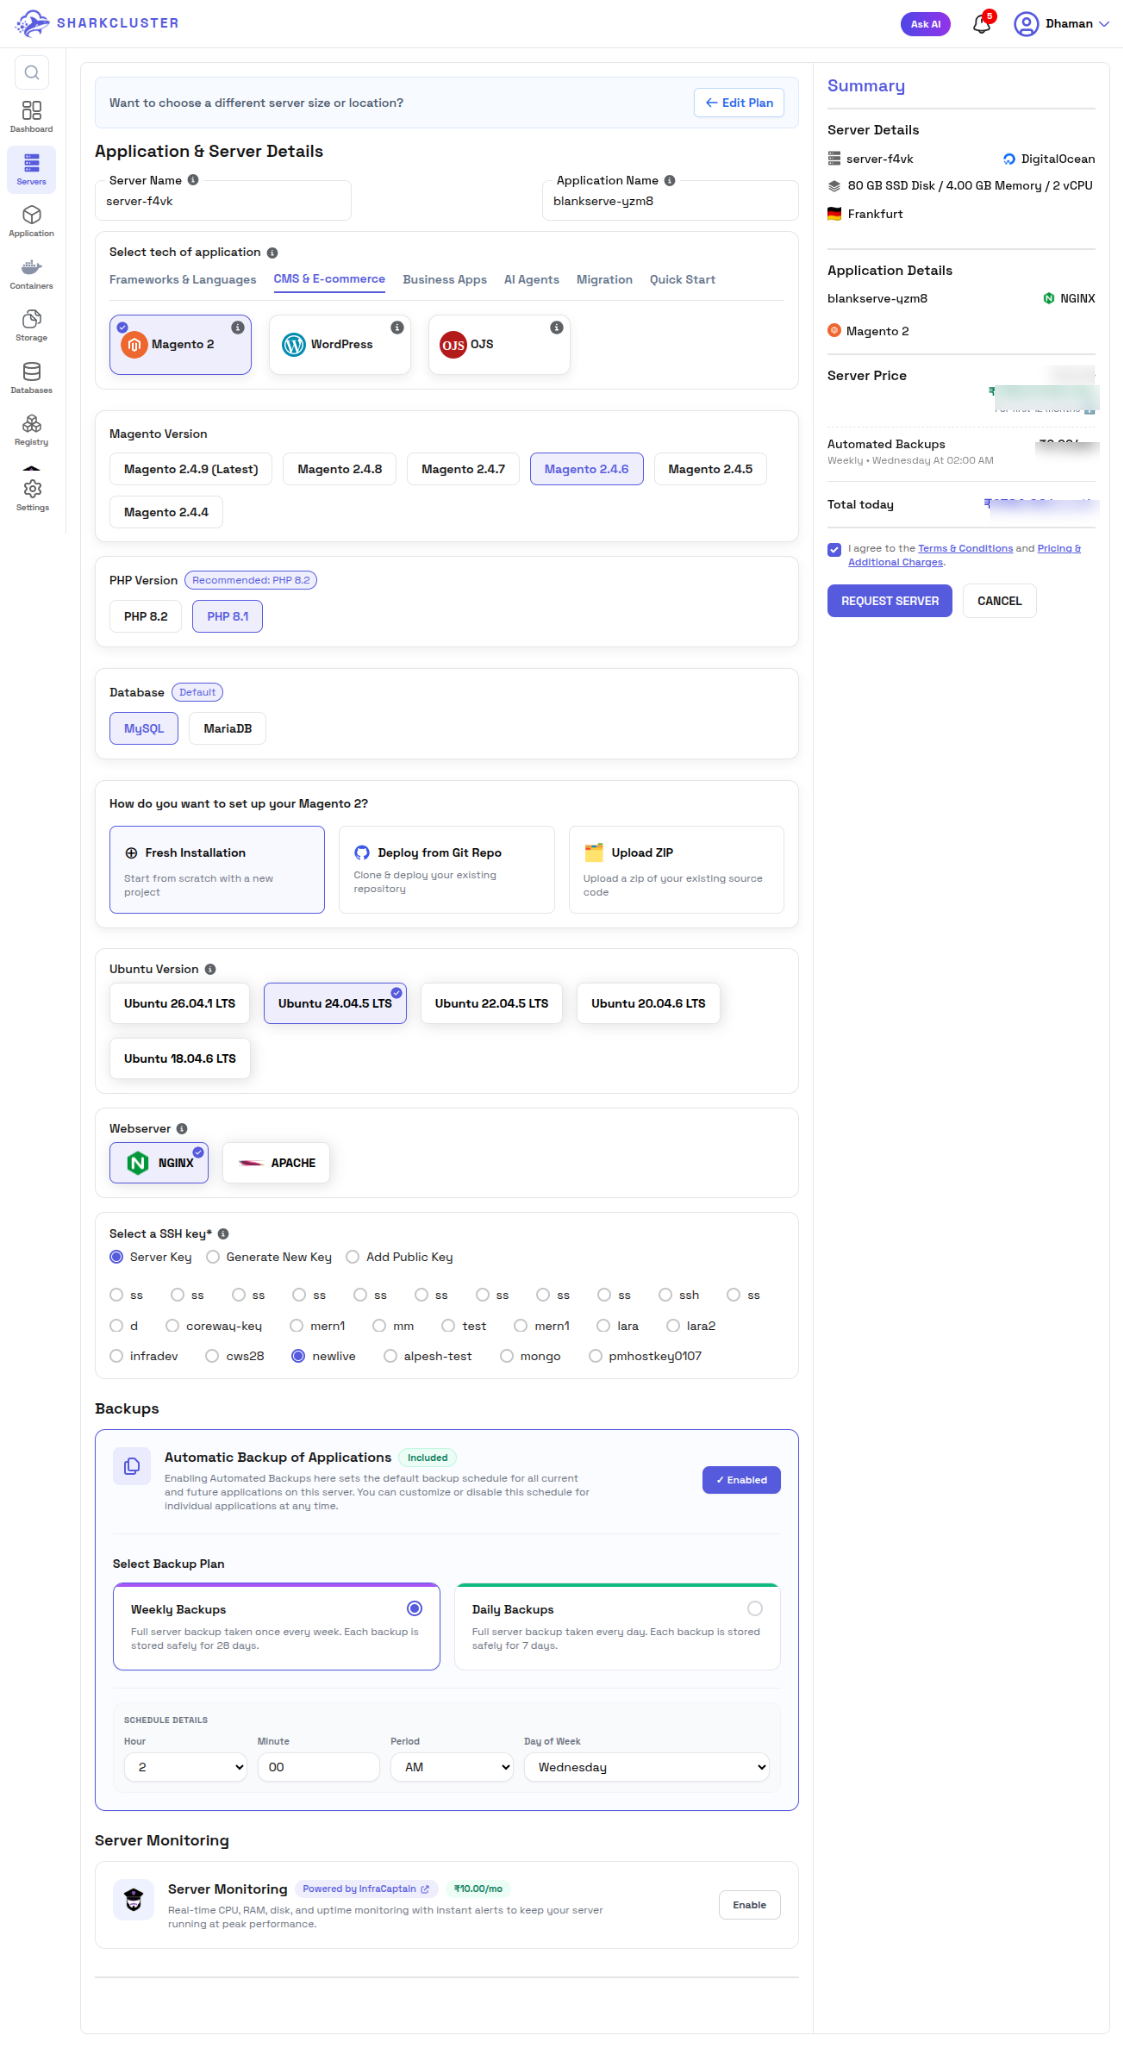
At this point, SharkCluster starts provisioning the server and preparing the Magento environment.
Step 3: SharkCluster Installs and Configures Magento 2
SharkCluster shows the Server Provisioning screen after requesting the server.
The dashboard displays the deployment's progress, so you don't have to wonder if the installation is still running.
The installation process is broken into stages such as:
- Initiating server setup
- Installing core system updates and software packages
- Configuring the database server
- Setting up the web server
- Configuring PHP and environment tools
- Deploying the application
The deployment progresses through these stages as depicted in the image below, with the current operation labeled Processing and the steps that have been completed clearly marked.
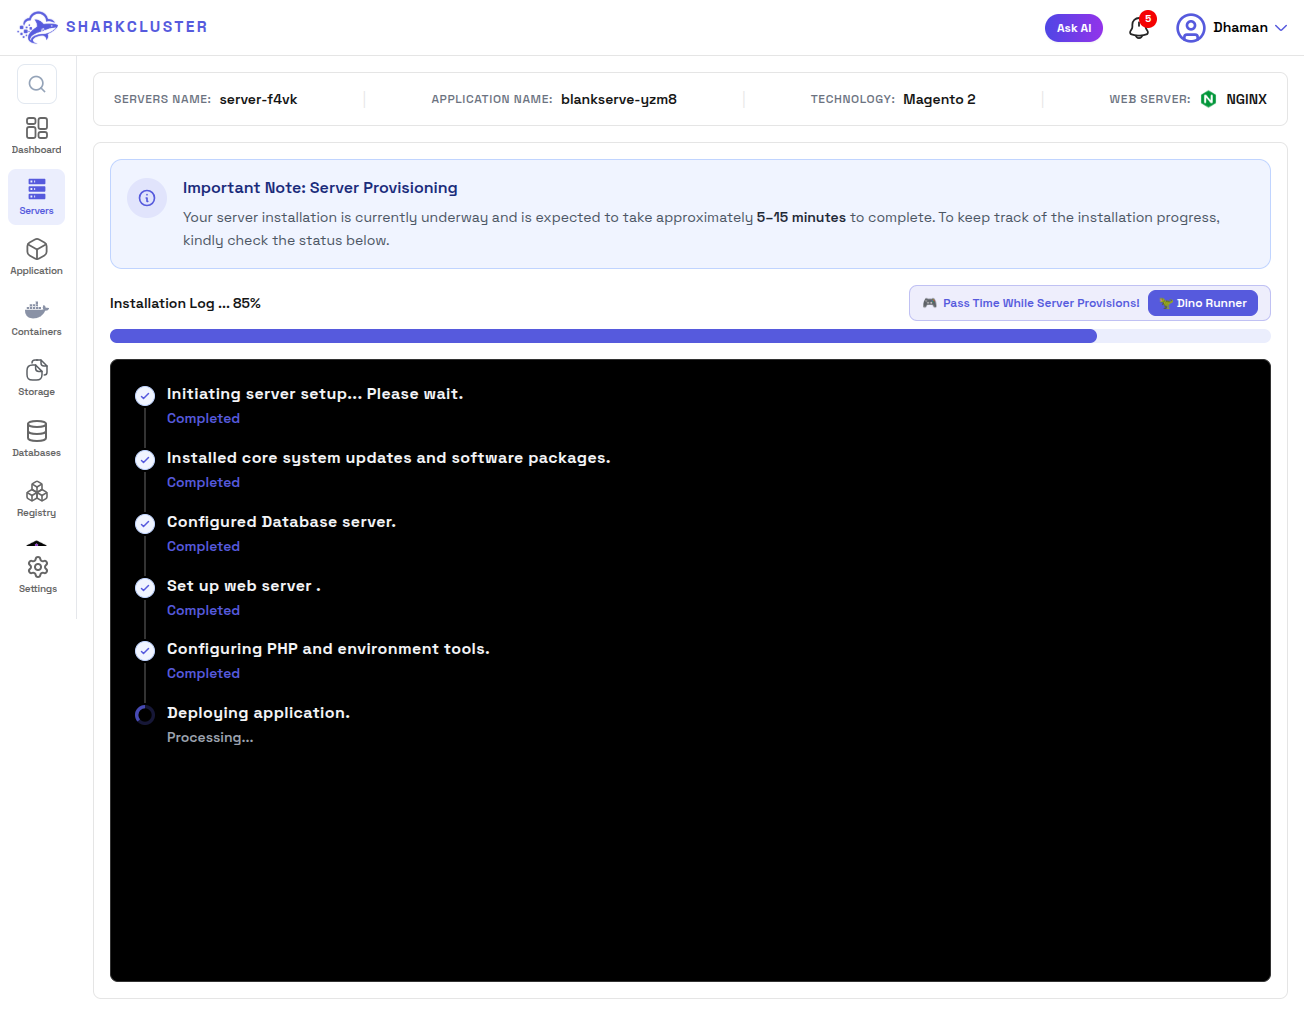
This type of progress view is useful because Magento deployments involve several infrastructure components. Track deployment progress directly in the SharkCluster panel without opening an SSH session. Instead of manually checking each service.
Elasticsearch Is Installed Automatically
One important part of a Magento 2 environment is search.
Magento 2 relies on a search engine for catalog search and related functionality. Configuring this manually is another step that developers otherwise need to handle when building a Magento server.
SharkCluster installs and configures Elasticsearch as part of the setup for the Magento 2 server.
As a result, you won't have to set up an Elasticsearch service on your own and then spend more time connecting it to Magento.
After taking care of the infrastructure preparation in the automated environment, you can move on to setting up your store.
For developers, this removes one more manual setup task from the Magento deployment process.
Step 4: Access Your Magento 2 Application Details
Once the server provisioning is complete, SharkCluster provides an application management dashboard.
The essential information required to manage the Magento installation can be found in the application overview.
The image shows details including:
- Application name
- Application type
- Database type
- Document root
- Application URL
- Magento admin URL
- Master user details
- Database credentials
- Database management
- Folder permissions
- SSH and SFTP access
- Application logs
- Processes
- Cron jobs
- Backup management
- Maintenance options
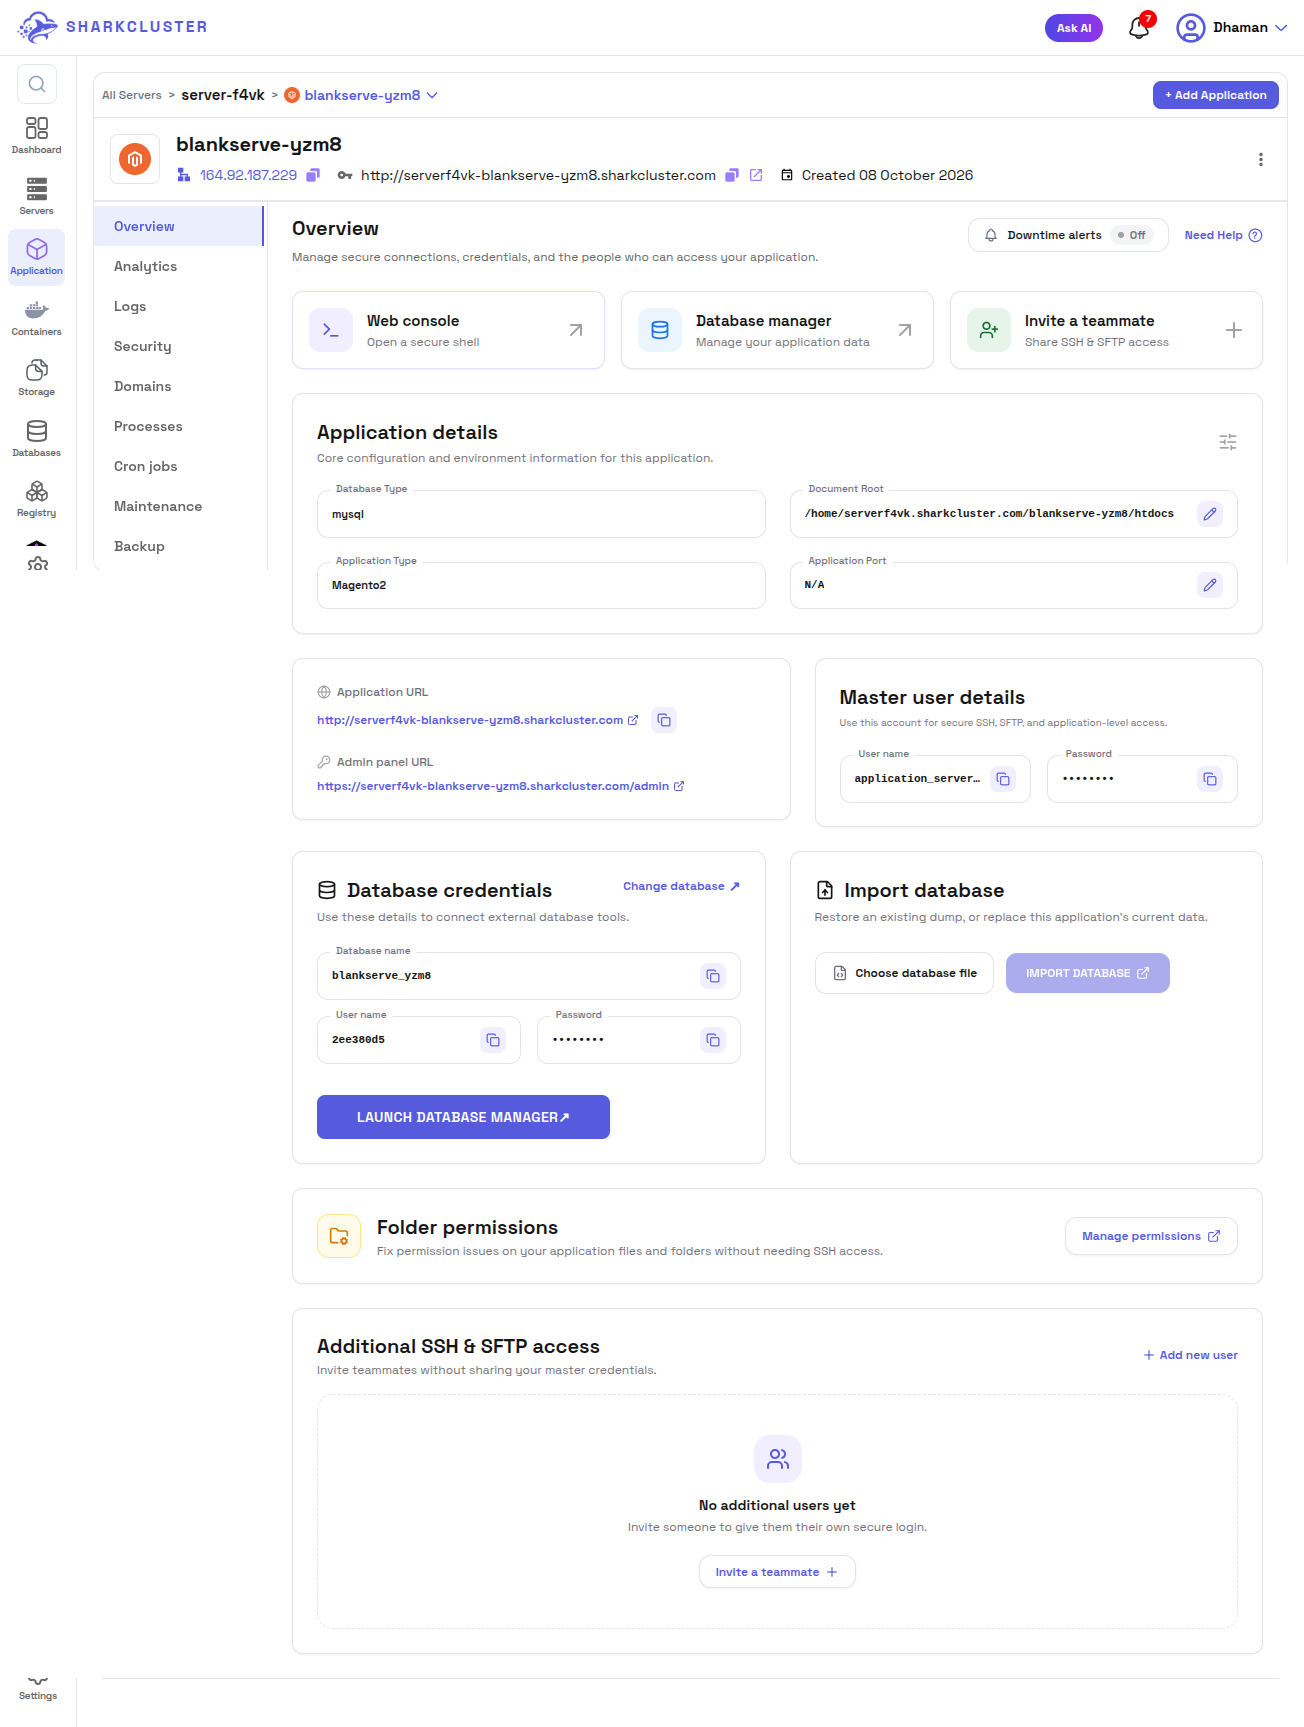
The application dashboard gives you a centralized place to manage your Magento deployment instead of having to remember where each server configuration is located.
Step 5: Open Your Magento 2 Store
After the deployment finishes, you can open the application URL provided by SharkCluster.
In the example deployment, the Magento store is available at:
http://serverf4vk-blankserve-yzm8.sharkcluster.com
Opening the URL displays the Magento storefront.
The typical Magento Luma storefront's homepage, search field, account links, shopping cart, and footer navigation are depicted in the image.
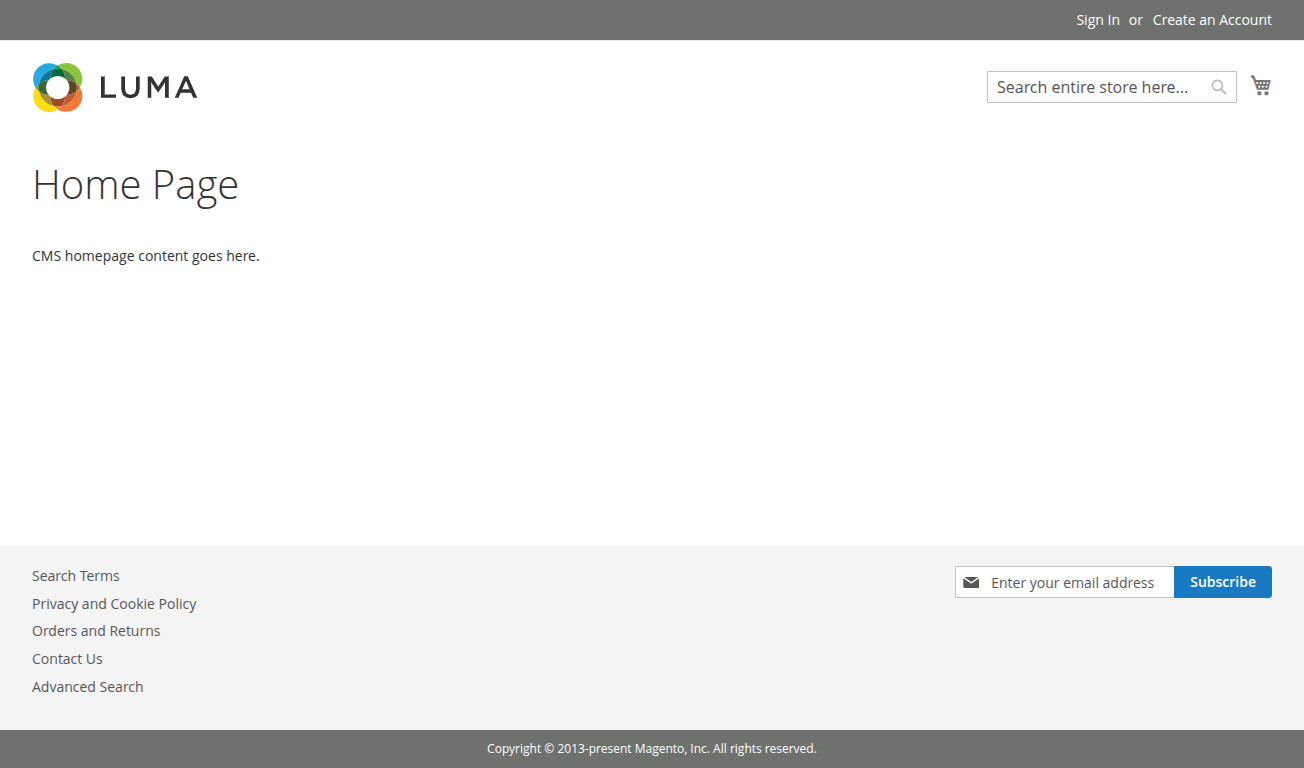
At this point, your Magento 2 application is running on the newly provisioned server.
You can move on to the following phase of your project, which includes connecting your production domain, setting up your store, adding products, installing extensions, customizing the theme, and so on.
What SharkCluster sets up for you
Using a managed deployment workflow eliminates the need to manually carry out each infrastructure task, which is one of the biggest benefits.
During a Magento 2 deployment, several components need to work together.
SharkCluster prepares the environment around the application, including:
Server Infrastructure
The selected cloud provider, region, CPU, RAM, and storage are used to create the server environment.
Operating System
The selected Ubuntu version is installed and prepared for the application.
Database
MySQL or MariaDB is set up in accordance with the deployment option you chose.
PHP
The selected PHP version is installed and configured for the Magento environment.
Web Server
You can choose between supported web server options such as NGINX or Apache.
Magento 2
The method of installation you select is used to deploy the selected Magento version.
Elasticsearch
There is no need to manually configure Elasticsearch because it is installed as part of the setup for Magento 2.
Application Control
After deployment, SharkCluster provides controls at the application level for managing credentials, databases, logs, processes, cron jobs, backups, maintenance, and other management tasks.
This combination significantly simplifies the deployment procedure for developers who would rather work on the store than prepare the underlying server.
How Long Does Magento 2 Deployment Take?
The exact deployment time depends on factors such as:
- Selected server provider
- Server resources
- Region
- Magento version
- Database configuration
- Network conditions
- Application deployment method
The SharkCluster provisioning screen indicates that server installation generally takes approximately 5–15 minutes.
The workflow is designed to get you from selecting a server to an accessible application quickly for a typical fresh Magento 2 deployment without requiring a lengthy manual installation process.
This is where the goal of deploying in less than ten minutes comes into play: rather than spending a lot of time setting up infrastructure during your development session, you can get a Magento environment that is ready for configuration much faster.
What About Zero Downtime?
Production Magento stores worry a lot about downtime.
If a store is offline for deployment, maintenance, or application updates, customers and ongoing orders may suffer.
The crucial distinction lies in the fact that zero-downtime production deployment and initial server provisioning are not exactly the same thing.
The initial Magento deployment shown in this guide creates a new environment, so there is no existing production store that needs to be taken offline.
For an existing production Magento store, zero-downtime deployment requires an appropriate release strategy, such as:
- Preparing the new application version separately
- Keeping the existing release available while deployment takes place
- Running database changes carefully
- Testing the new release before switching traffic
- Using a controlled traffic or symlink switch
- Retaining the ability to roll back
- Avoid lengthy maintenance windows
SharkCluster's infrastructure-focused workflow is a solid foundation for managing Magento environments; however, your production application and deployment pipeline configuration will determine the actual zero-downtime strategy.
What distinguishes this Magento 2 deployment strategy?
A blank VPS is typically the starting point for traditional Magento installation.
You may need to manually:
- Create the server.
- Connect through SSH.
- Update Ubuntu.
- Install PHP.
- Configure PHP extensions.
- Install MySQL or MariaDB.
- Install NGINX or Apache.
- Install Composer.
- Configure Magento.
- Install and configure Elasticsearch.
- Configure permissions.
- Configure cron jobs.
- Deploy the Magento source.
- Configure the web server.
- Test the application.
Although each step is straightforward on its own, when taken together, they result in a significant amount of setup work.
Many of these tasks are incorporated into a guided deployment procedure by SharkCluster.
You select your infrastructure and application options from the dashboard, submit the deployment, monitor the installation progress, and then manage the resulting Magento application from the platform.
Pre-launch checklist
Consider the following prior to launching a Magento store in production:
- Choose an appropriate server size
- Select your cloud provider
- Select a nearby region
- Choose SSD or NVMe storage according to workload
- Select the Magento 2 version
- Select a compatible PHP version
- Choose MySQL or MariaDB
- Select NGINX or Apache
- Configure an SSH key
- Enable automated backups
- Enable server monitoring when required
- Verify Elasticsearch availability
- Test the Magento storefront
- Test the Magento admin panel
- Configure your production domain
- Enable HTTPS before going live
- Configure DNS
- Review Magento security settings
- Test cron jobs and background processes
- Test backups and recovery procedures
From Server Creation to Magento Storefront
The complete workflow is straightforward:
Select Server → Configure Magento → Request Server → Provision Infrastructure → Install Magento → Install Elasticsearch → Open Application
Instead of manually assembling every part of the stack, SharkCluster gives you a guided deployment experience from the dashboard.
This can significantly cut down on the amount of time developers who work with Magento 2 spend preparing the infrastructure and free up more time to work on the eCommerce application itself.
Final Thoughts
Deploying Magento 2 doesn't have to begin with hours of server configuration.
With SharkCluster, you can select your server resources, choose your Magento version, configure PHP and the database, select your web server, configure SSH access, and start the deployment from a single workflow.
Once provisioning begins, SharkCluster handles the server preparation and application setup, including automatic Elasticsearch installation for the Magento environment.
In the Magento application dashboard, after deployment, you can manage server-related features like database credentials, application URLs, logs, processes, cron jobs, backups, maintenance, and more.
SharkCluster provides a practical deployment workflow that takes you from server selection to a functioning Magento storefront in minutes for developers who want a faster way to get Magento 2 running without manually preparing every component.
Ready to deploy Magento 2? Start with SharkCluster and build your Magento environment without the usual server setup overhead.
Run this on your own VPS
Deploy servers and applications on infrastructure you own, managed from one panel — backups, caching, firewall and monitoring included.