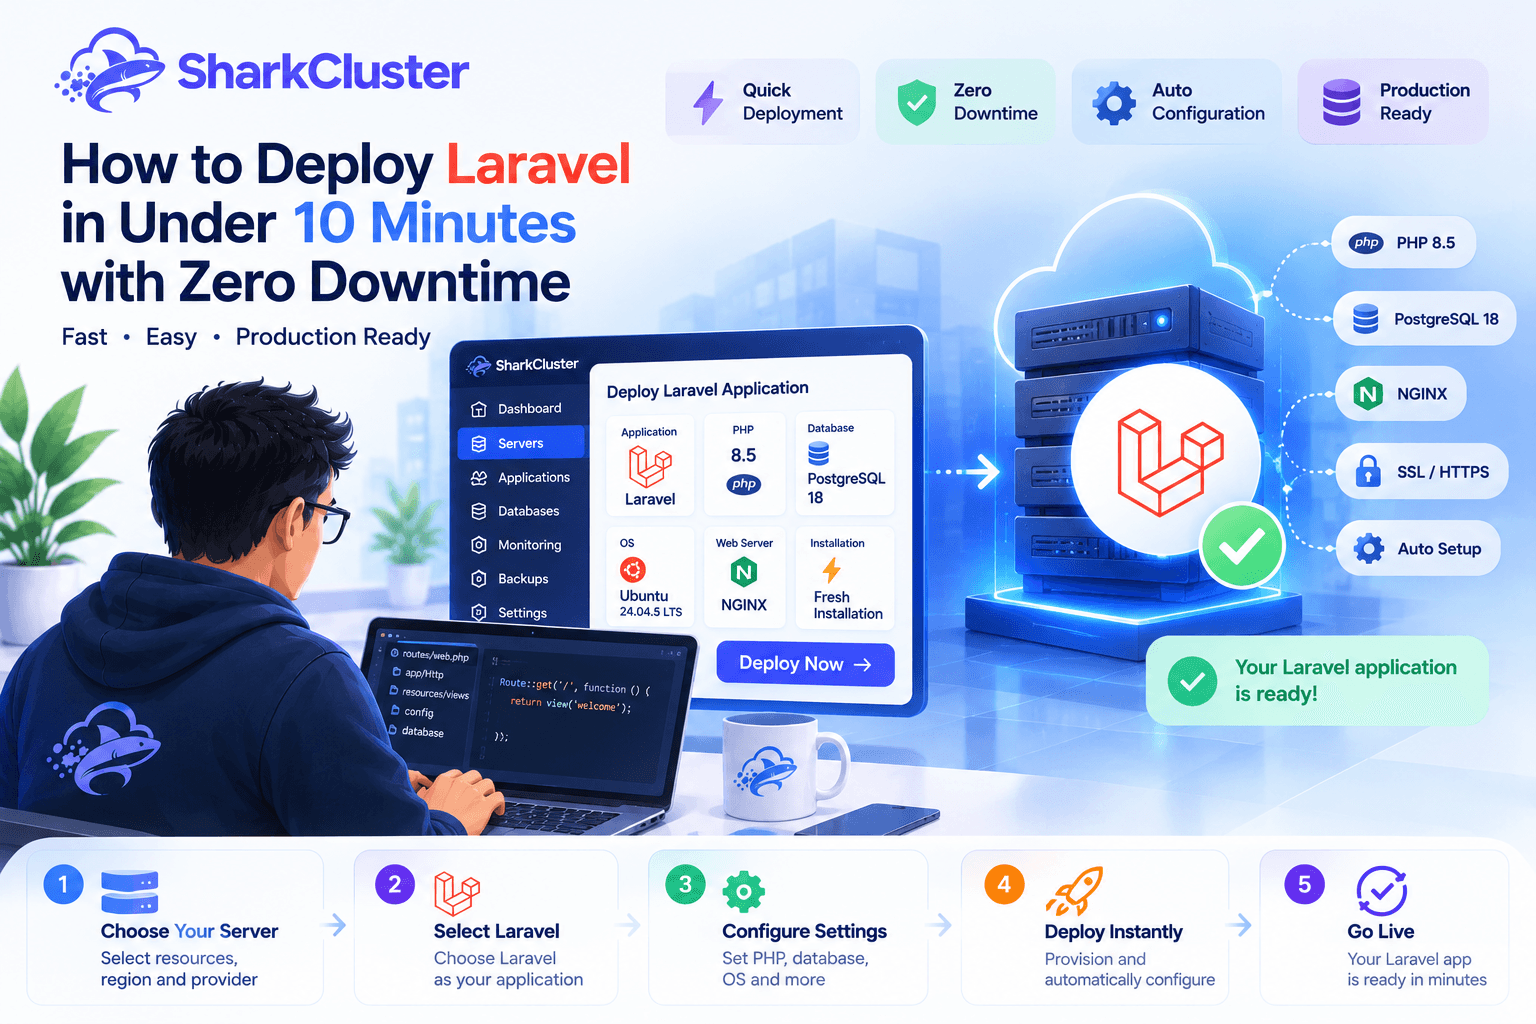

Deploying a Laravel application doesn't have to mean spending hours configuring PHP, NGINX, databases, SSL, application directories, and server permissions manually.
With the right deployment workflow, you can go from an empty server to a working Laravel application in just a few steps.
In this guide, we'll walk through how to deploy Laravel using SharkCluster, from selecting the server resources and Laravel environment to provisioning the server, checking the installation progress, accessing application credentials, and opening the deployed Laravel application.
The workflow shown in this guide uses a Laravel application with NGINX, PHP, PostgreSQL, Ubuntu, and automatic server configuration handled during provisioning.
The goal is simple: reduce the amount of manual server work while keeping the deployment process predictable and production-ready.
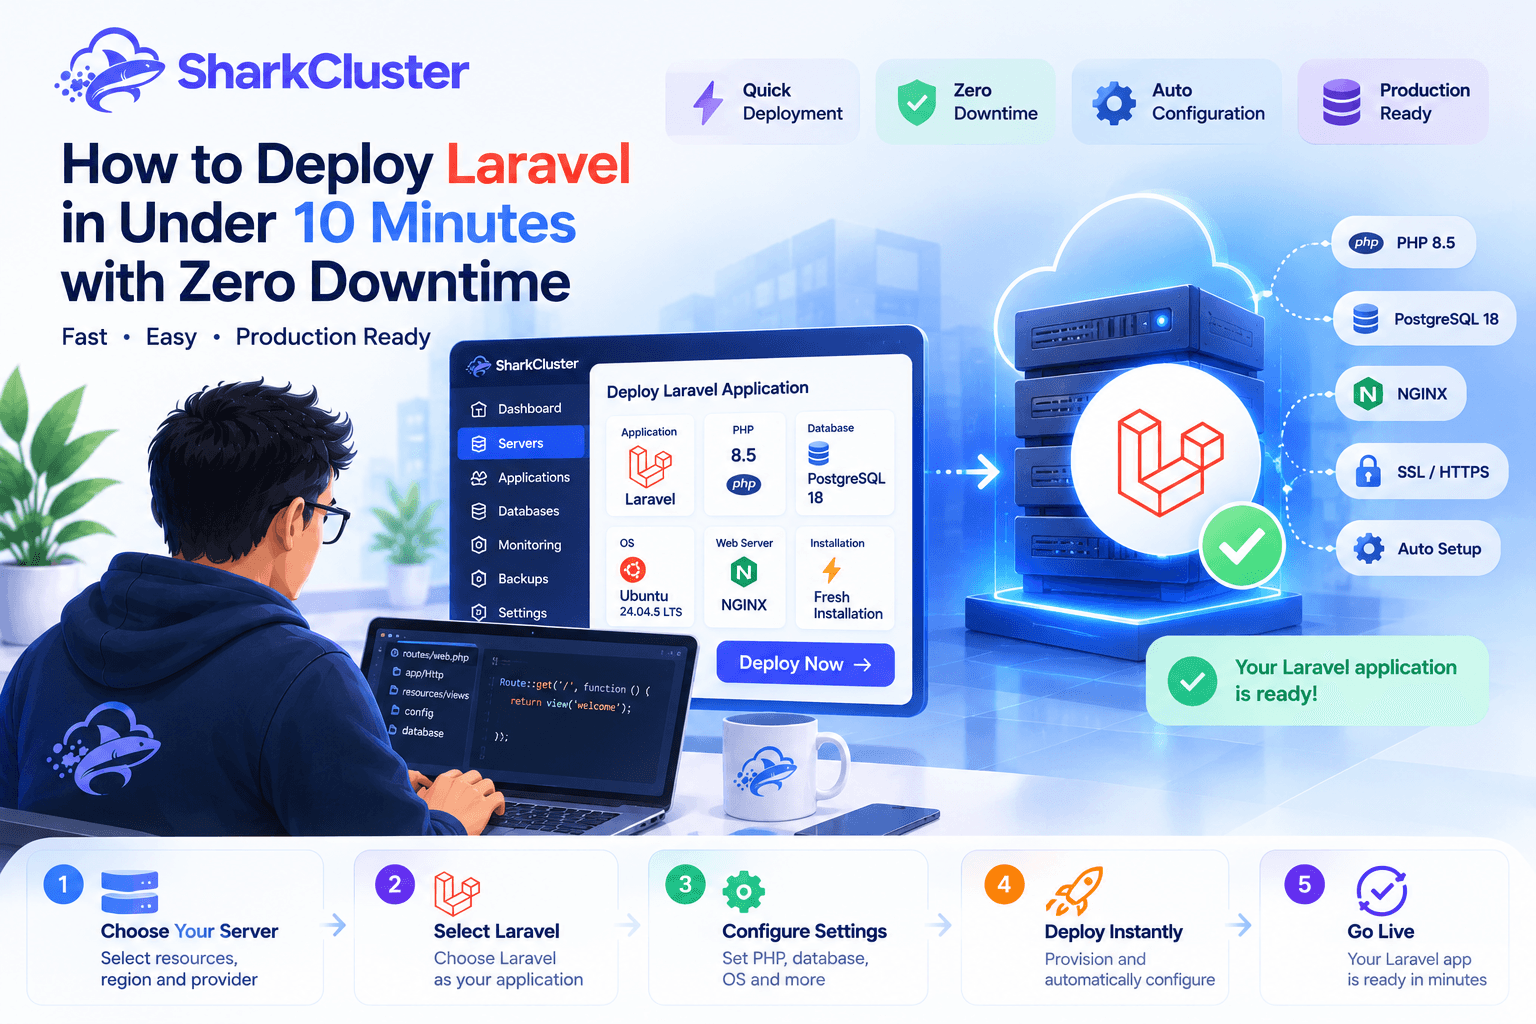
Why Laravel Deployment Can Take Time
Laravel itself is relatively straightforward to install. The complexity usually comes from everything around the application.
A traditional deployment may require you to manually:
- Provision a cloud server
- Connect through SSH
- Update the operating system
- Install PHP
- Install required PHP extensions
- Install Composer
- Configure NGINX or Apache
- Install and configure a database
- Create a database and database user
- Configure PHP-FPM
- Set application permissions
- Configure the Laravel document root
- Configure environment variables
- Create a virtual host
- Restart services
- Test the application
None of these tasks is particularly difficult individually. The problem is that there are many of them.
SharkCluster brings these configuration steps into the server and application deployment workflow so you can select the environment you need before provisioning the server.
Step 1: Choose Your Laravel Server
The first step is to choose the infrastructure for your Laravel application.
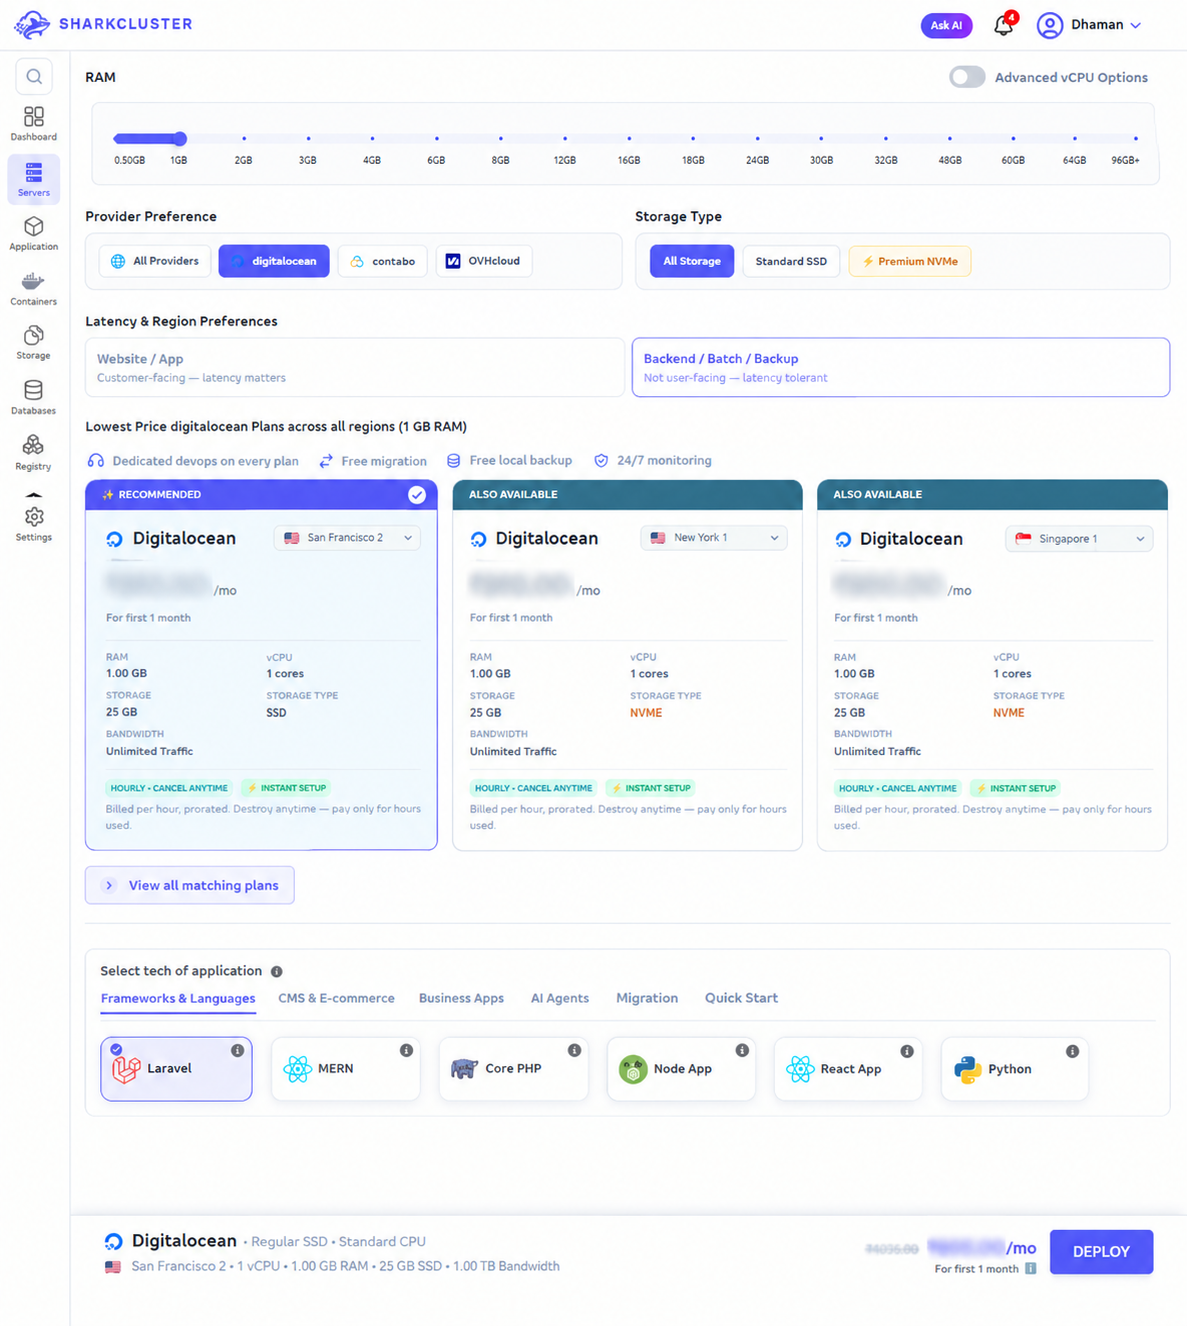
In the SharkCluster server creation screen, you can select the amount of RAM, provider, storage type, and region according to the requirements of your application.
For the example shown in the deployment workflow, the selected server uses:
- Provider: DigitalOcean
- Region: San Francisco 2
- RAM: 1 GB
- vCPU: 1 core
- Storage: 25 GB SSD
- Bandwidth: Unlimited traffic
- Web server: NGINX
The server selection screen also lets you choose between different storage options and infrastructure providers.
For a customer-facing Laravel application, the Website / App latency preference can be useful because it prioritizes infrastructure closer to your users.
For backend jobs, batch processing, or backups, the Backend / Batch / Backup option can be more appropriate.
Select Laravel as the application technology
Next, go to Select tech of application and choose Laravel.
SharkCluster groups Laravel with other frameworks and application technologies, making it possible to select the application environment during server creation instead of configuring it manually after connecting to the server.
This is the first major time saver in the deployment process.
Step 2: Configure Your Laravel Application
After selecting your server, click Deploy to continue with the application configuration.
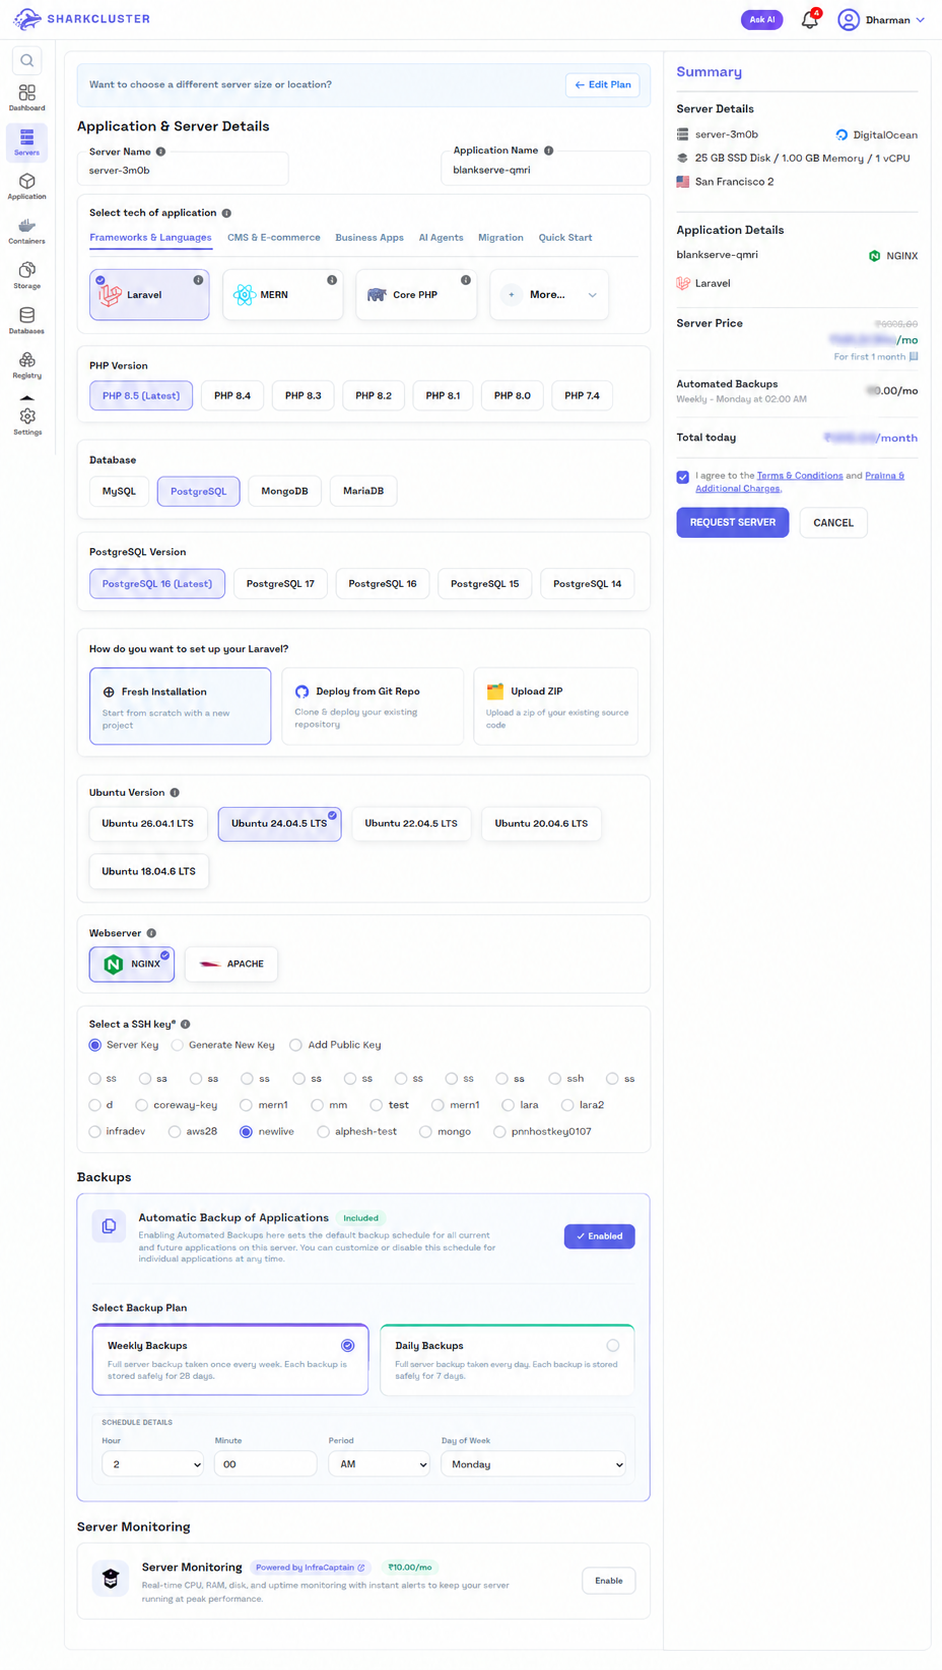
The next screen allows you to define the server and application details before the server is provisioned.
In the example, the configuration includes:
- Application: Laravel
- PHP: PHP 8.5
- Database: PostgreSQL
- PostgreSQL: 18
- Ubuntu: 24.04.5 LTS
- Web server: NGINX
- Installation: Fresh Installation
You can also configure the application name and server name.
For example:
Server Name: server-3m0b
Application Name: blankserve-qmri
The exact names will obviously depend on your project.
Choose the Laravel Installation Method
SharkCluster provides different ways to set up your application.
For a new Laravel project, choose:
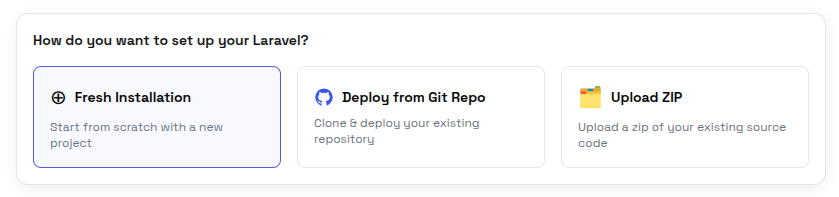
Fresh Installation
This is useful when you want to start with a clean Laravel application.
If you already have an application, you can instead choose an option such as deploying from a Git repository or uploading your existing application as a ZIP file.
This makes the same server workflow useful for both new projects and existing Laravel applications.

Select the PHP Version
Laravel applications depend heavily on the PHP version and extensions available on the server.
In the example, PHP 8.5 is selected.
Before deploying an existing Laravel application, make sure the PHP version you select is compatible with the Laravel version and packages used by your project.
For an existing application, your composer.json should be the final reference for the PHP requirement.
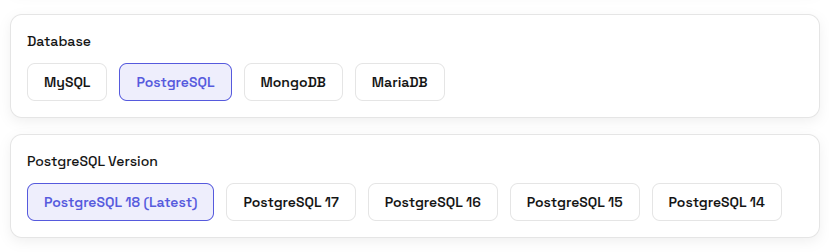
Configure the Database
The deployment screen also allows you to select the database engine.
The example uses:
PostgreSQL 18
Depending on your application requirements, you may select another supported database option.
This is particularly useful because the database can be configured as part of the application deployment instead of requiring a separate manual database setup.

Configure the Web Server
The example uses:
NGINX
NGINX is a common choice for Laravel production deployments because it can handle incoming HTTP requests and pass PHP requests to PHP-FPM.
With the web server selected during deployment, you don't have to manually create an NGINX server block before testing the application.
Step 3: Configure Backups and Monitoring
A production Laravel application needs more than just PHP and a database.
The deployment workflow also provides options for backups and monitoring.
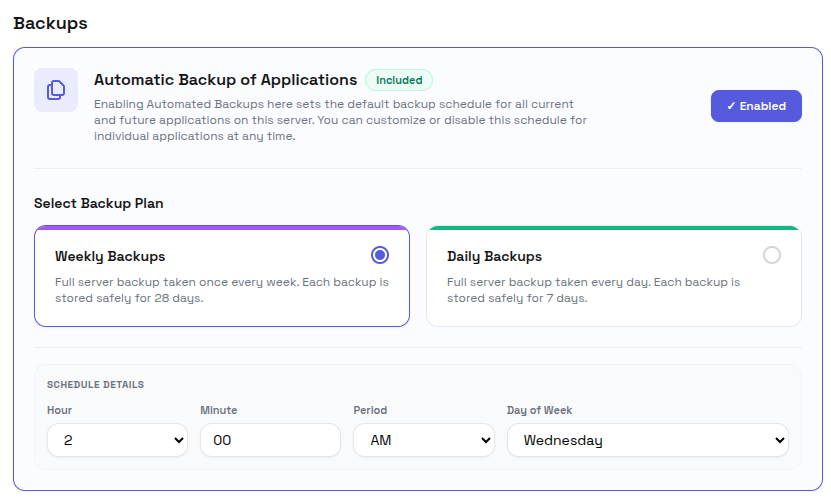
In the example, Automatic Backup of Applications is enabled.
You can select a backup schedule such as:
- Weekly backups
- Daily backups
The screenshot shows a weekly backup configuration scheduled for Monday at 2:00 AM.
The screenshot shows a weekly backup configuration scheduled for Monday at 2:00 AM.
You can also enable Server Monitoring to keep an eye on server resources such as CPU, RAM, and disk usage.
For production applications, monitoring can help you identify resource problems before they become application outages.
Step 4: Start Server Provisioning
Once the application, database, web server, SSH key, backup, and monitoring settings are configured, review the summary and click:
REQUEST SERVER
SharkCluster then begins provisioning the server.
This is where the automated deployment process becomes useful.
Instead of opening an SSH session and manually running a long sequence of installation commands, the platform handles the initial server configuration based on the options selected during deployment.
Step 5: Watch the Laravel Server Installation
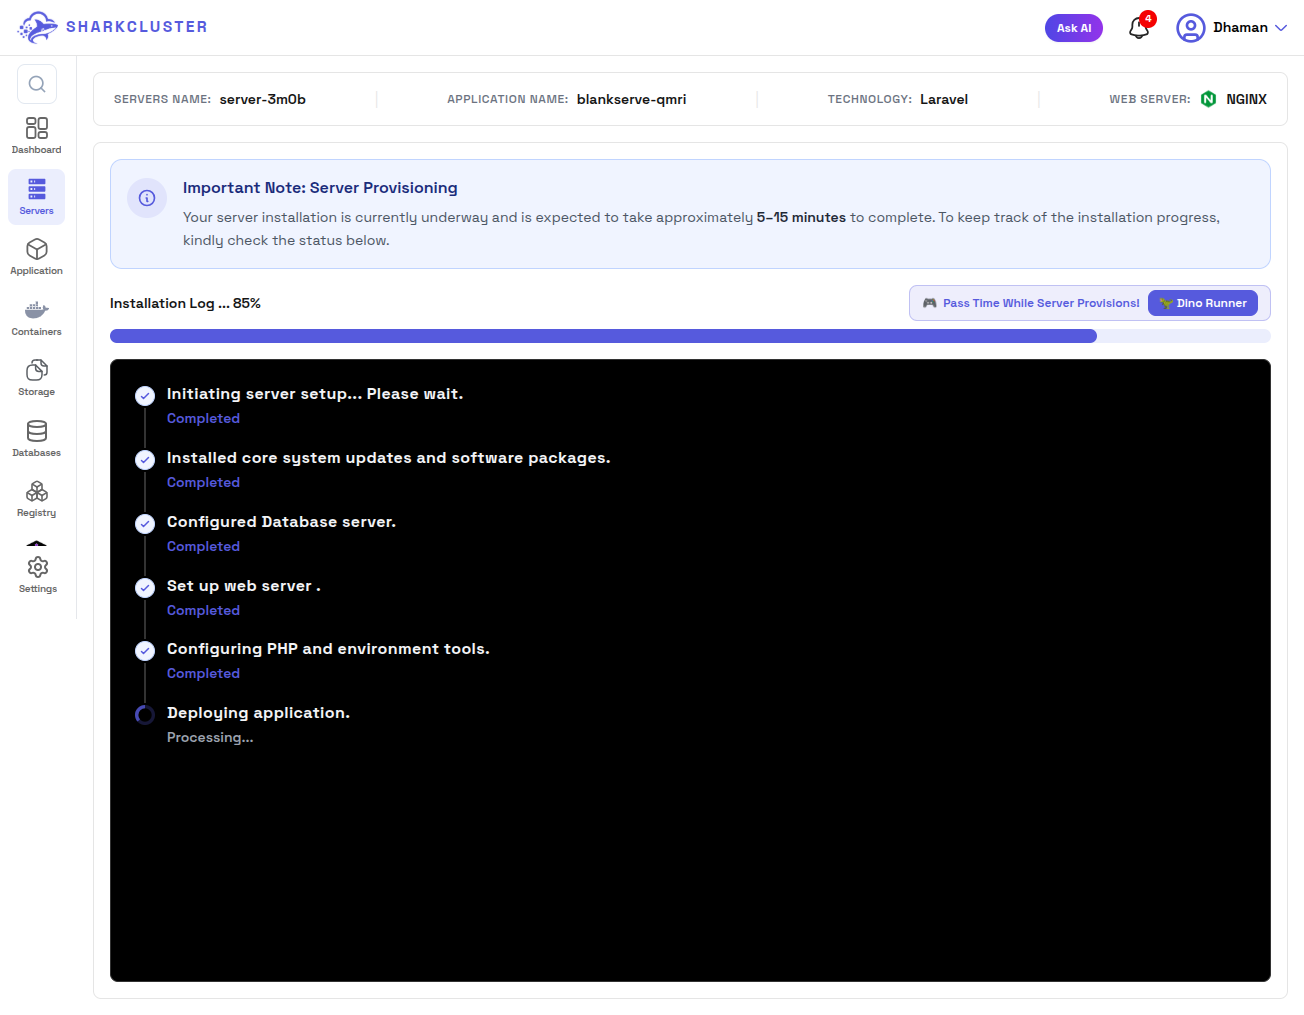
After requesting the server, SharkCluster displays the installation progress.
The installation screen provides a visual progress indicator and installation log.
The example shows the following stages:
- Initiating server setup
- Installing core system updates and software packages
- Configuring database server
- Setting up web server
- Configuring PHP and environment tools
- Deploying application
The screenshot shows the process at approximately 85%, with the application deployment step still processing.
This is useful because you don't have to guess whether the server is still being configured or whether something has stopped.
Instead, you can see which stage is currently running.
Why this matters
One of the biggest problems with manual deployments is uncertainty.
You may install PHP successfully but have a problem with PHP-FPM. NGINX might be running but point to the wrong document root. The database might be available but the application user may not have the required permissions.
A visible provisioning workflow makes these stages easier to understand.
Step 6: Access Your Laravel Application Details
Once provisioning is complete, open the Laravel application from your SharkCluster dashboard.
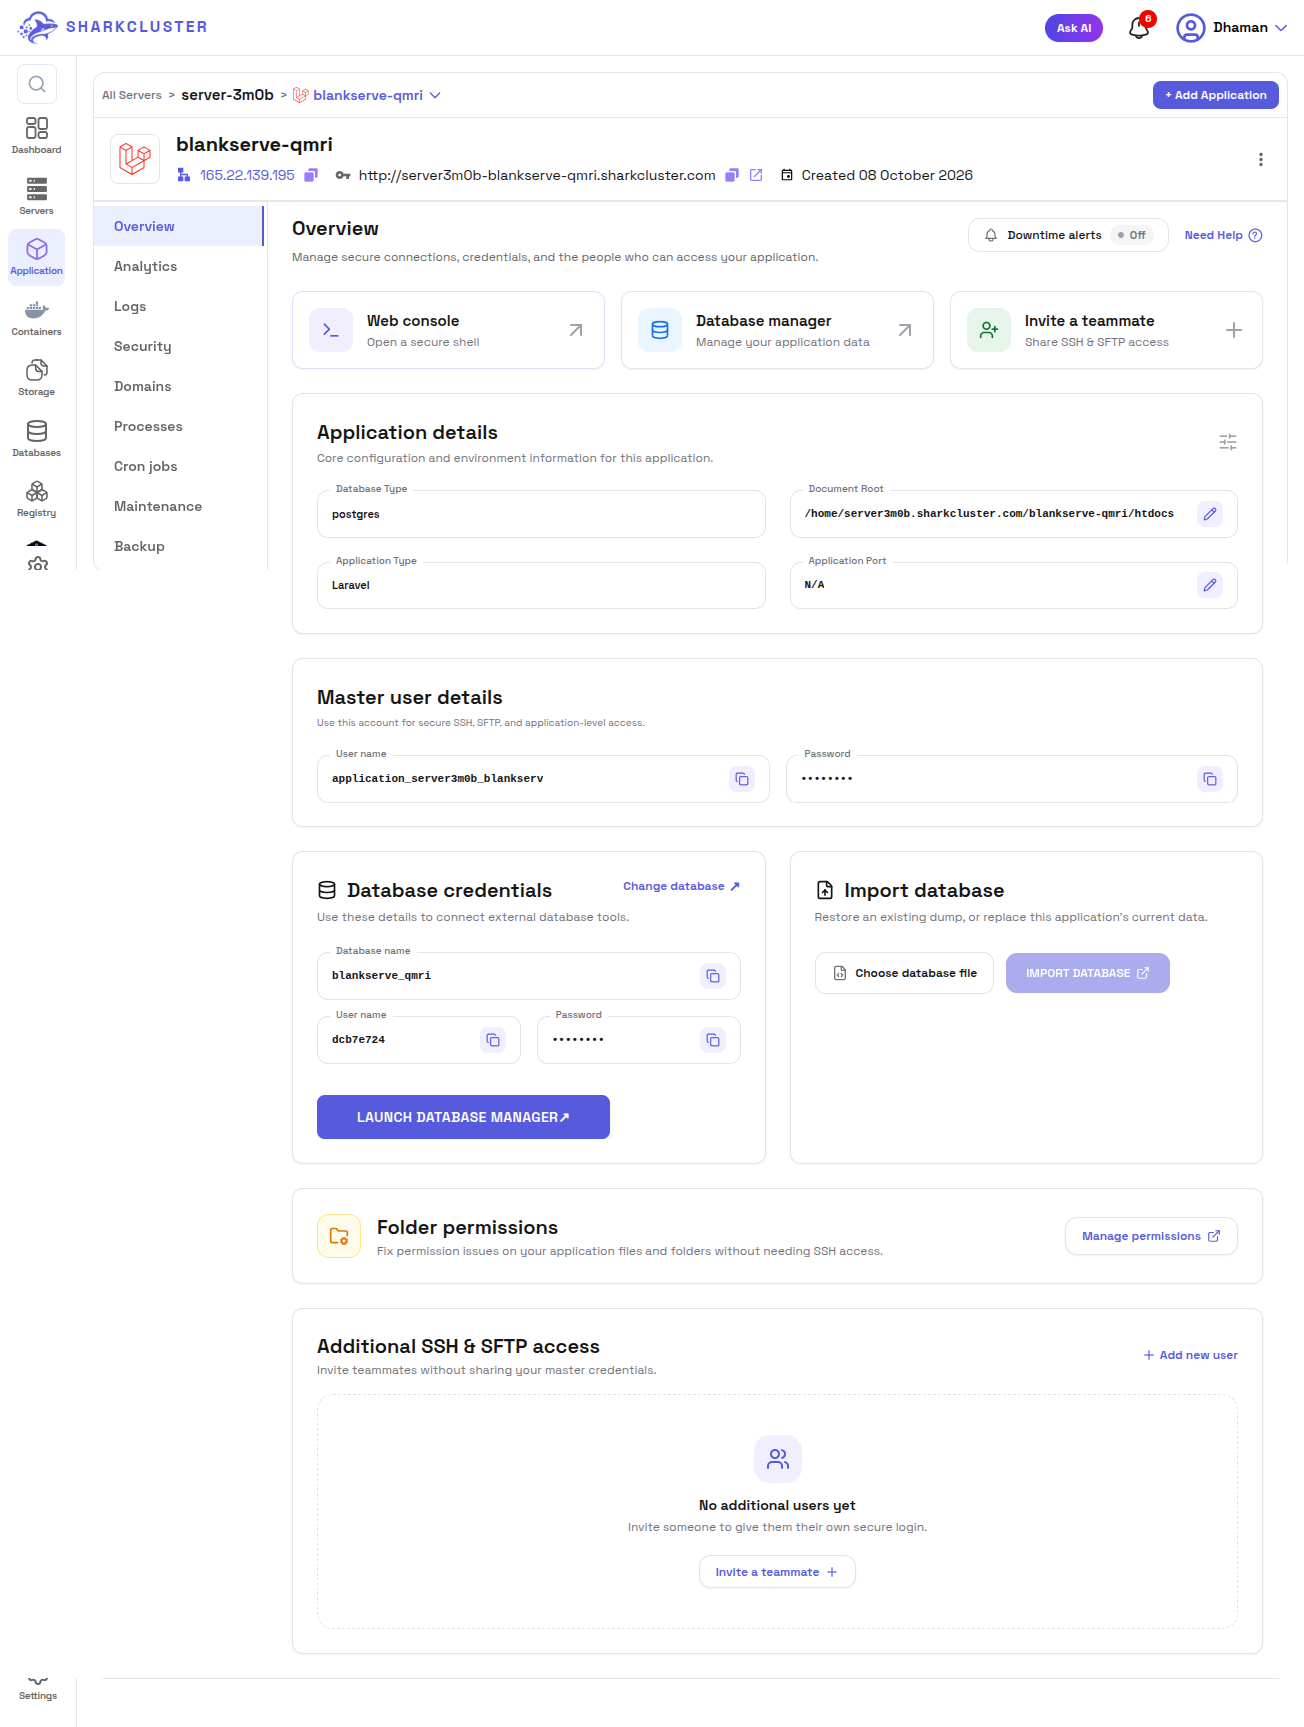
The application overview provides the information you need to manage the deployment.
The example application shows:
Application: blankserve-qmri
It also provides information about:
- Server IP
- Application URL
- Application type
- Database type
- Document root
- Application port
- Master user
- Database credentials
- Additional SSH/SFTP access
The document root in the example points to the application's htdocs directory.
This is particularly useful when troubleshooting because you can see the actual application location without having to search through the server filesystem.
Database Credentials in One Place
The application overview also provides database connection information.
The example contains:
- Database name
- Database username
- Database password
- Database manager access
Instead of searching through configuration files or creating database credentials manually, the required connection information is available from the application management screen.
For security, credentials should still be handled carefully and never committed to Git repositories.
Step 7: Open the Laravel Application
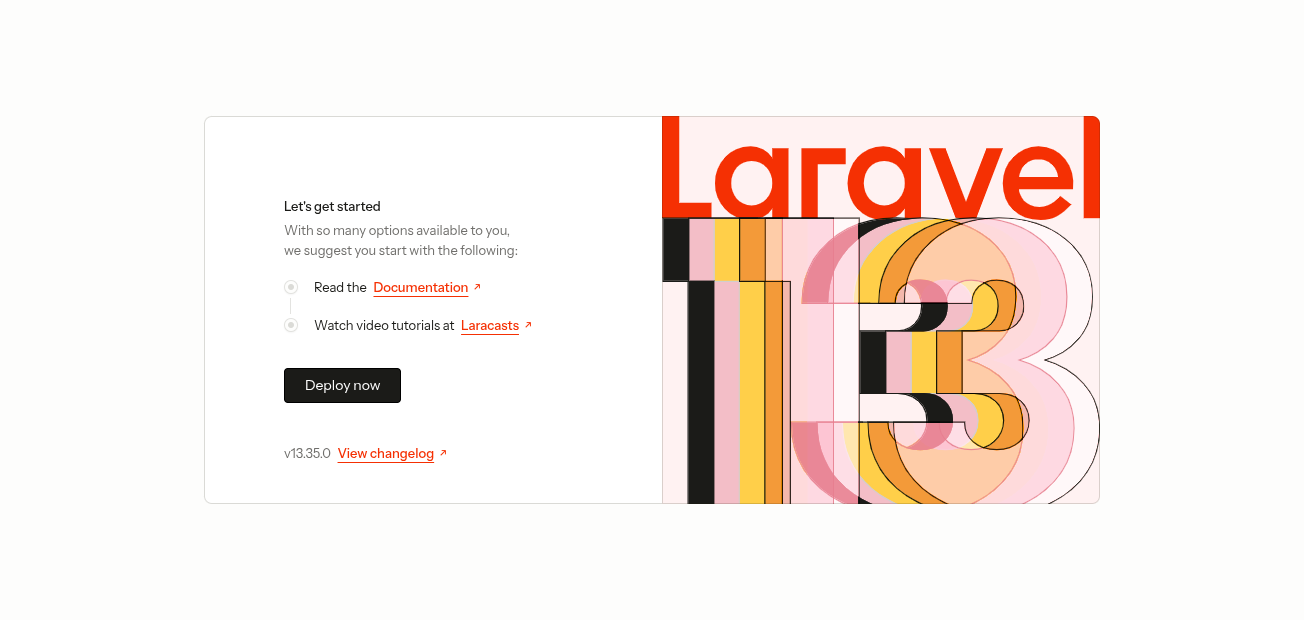
After the deployment finishes, open the application URL shown in the application dashboard.
For the example deployment, the URL is:
http://server3m0b-blankserve-qmri.sharkcluster.com
The deployed application opens with the Laravel welcome page.
The example displays:
Laravel v13.35.0
Seeing the Laravel welcome page confirms that the basic application deployment is working and that the web server is successfully serving the Laravel application.
At this point, you can begin deploying your actual application code, configuring environment variables, connecting your application to its database, and completing your production setup.
What About Zero-Downtime Deployment?
Getting a fresh Laravel server online quickly is only one part of production deployment.
The more important question for an existing production application is:
How do you deploy new code without taking the application offline?
A zero-downtime deployment generally means that users continue receiving responses while a new application version is being prepared.
A typical production strategy looks like this:
1. Build the new release separately
Don't replace the currently running application files immediately.
Prepare the new release in a separate directory or release location.
2. Install dependencies
Run Composer for the new release:
composer install --no-dev --optimize-autoloader3. Prepare the environment
Make sure the correct .env configuration is available to the release.
Never store production secrets directly in your Git repository.
4. Run database migrations carefully
For Laravel applications:
php artisan migrate --forceMigrations should be designed to remain compatible with both the old and new application versions when you need truly zero-downtime releases.
For example, avoid immediately removing a database column that the currently running application still requires.
5. Cache the application
After deployment, Laravel production caches can be rebuilt:
php artisan config:cache
php artisan route:cache
php artisan view:cache
Use the commands appropriate for your application's Laravel version and deployment process.
6. Switch the active release
Once the new release is ready, point the web server or application process to the new release.
The switch should be fast enough that users don't experience an extended maintenance window.
7. Reload services gracefully
Where required, reload PHP-FPM, NGINX, queue workers, or other application services using a graceful strategy rather than abruptly stopping production processes.
Laravel Deployment Checklist
Before considering a production Laravel deployment complete, check the following:
Server
- Server has sufficient RAM and CPU
- Correct region selected
- Ubuntu version configured
- NGINX or Apache configured
- PHP version matches application requirements
Laravel
- Composer dependencies installed
.envconfiguredAPP_KEYconfigured- Correct application document root configured
- Storage permissions verified
- Laravel caches configured
Database
- Database created
- Database credentials configured
- Migrations completed
- Database connection tested
Production
- HTTPS/SSL configured
- Domain configured
- Queue workers configured if required
- Scheduler configured if required
- Backups enabled
- Server monitoring enabled
- Deployment rollback strategy available
Why Use SharkCluster for Laravel Deployment?
The biggest advantage is not simply installing Laravel.
It's reducing the number of infrastructure tasks you have to perform manually.
With the SharkCluster workflow shown in this guide, you can select your:
- Cloud provider
- Server size
- Region
- Storage
- Laravel environment
- PHP version
- Database
- Database version
- Operating system
- Web server
- SSH access
- Backup schedule
- Monitoring
and then let the platform handle the initial server provisioning.
That means developers can spend less time preparing infrastructure and more time working on the application itself.
For teams deploying multiple Laravel applications, having the same repeatable process can also reduce configuration differences between servers.
Final Thoughts
A Laravel deployment doesn't need to begin with a terminal full of commands.
With an automated server provisioning workflow, you can select the infrastructure and application environment, start the server installation, monitor the provisioning process, access your application credentials, and open the Laravel application from a single workflow.
The example shown in this guide goes from server selection to a working Laravel application with NGINX, PHP, PostgreSQL, Ubuntu, backups, and monitoring configured through the SharkCluster deployment flow.
For production applications, the next step is to build a proper release process around that infrastructure. With separate releases, compatible database migrations, dependency management, health checks, and graceful service reloads, Laravel applications can be updated with little or no user-visible interruption.
Deploy your Laravel application faster, spend less time configuring servers, and keep your production workflow repeatable with SharkCluster.
Run this on your own VPS
Deploy servers and applications on infrastructure you own, managed from one panel — backups, caching, firewall and monitoring included.