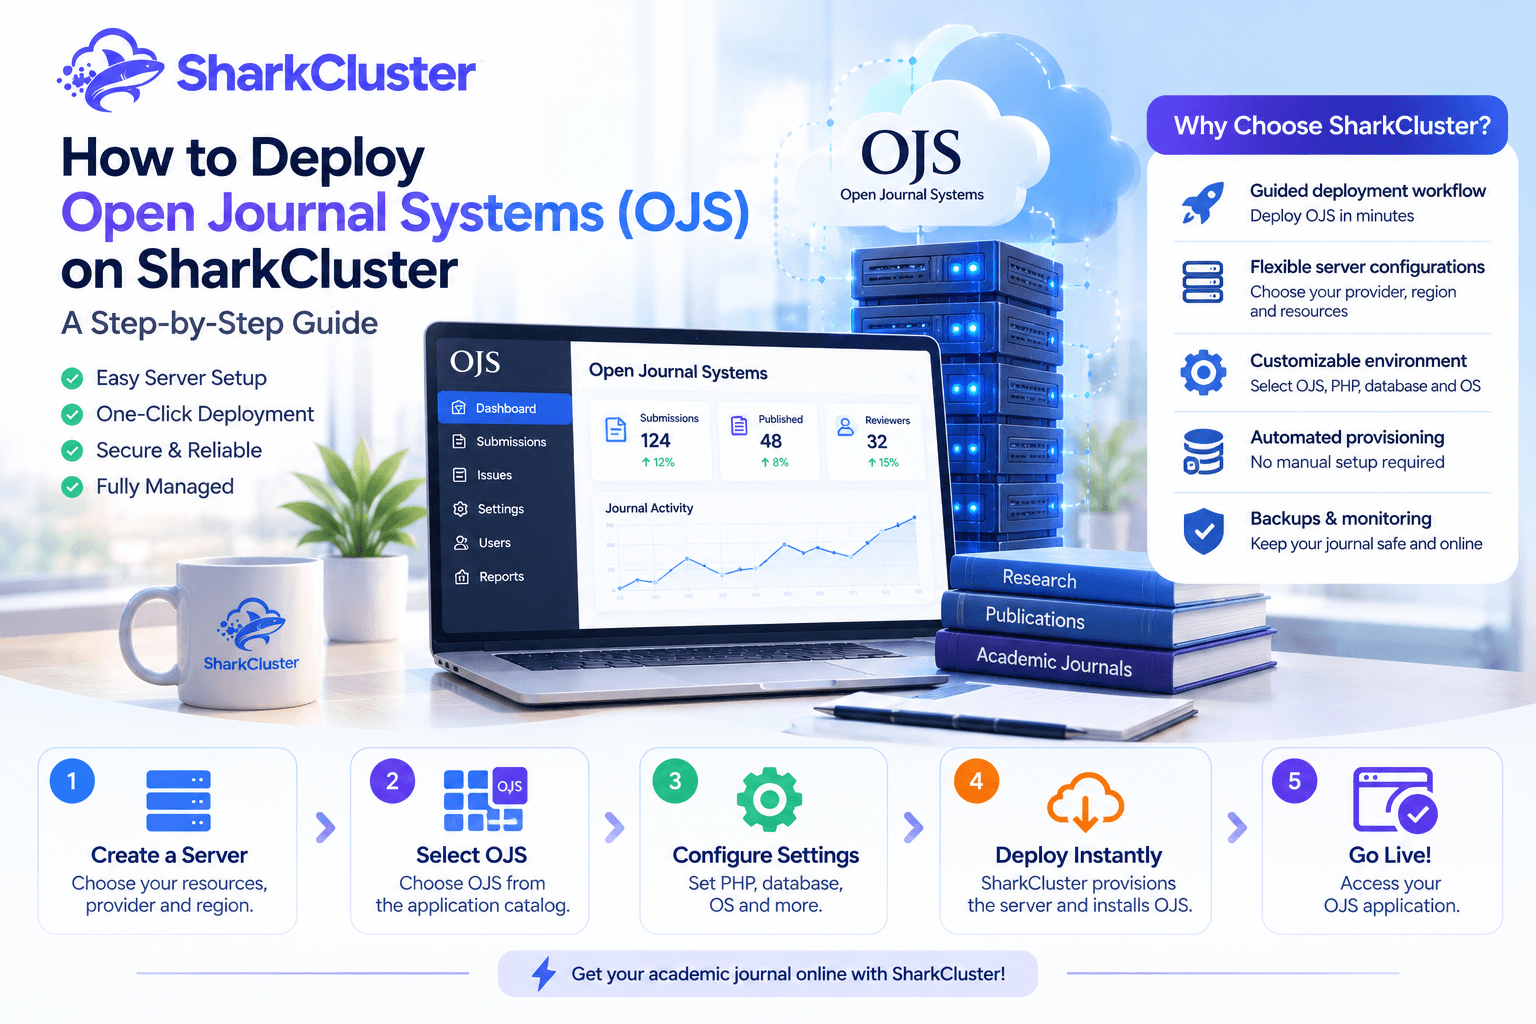

More than just having a place to store articles is necessary for managing an academic journal. You need a dependable platform where readers can access published research, reviewers can evaluate manuscripts, and editors can manage submissions. These publishing tools are available from Open Journal Systems (OJS), but manual installation may necessitate server configuration, database setup, PHP dependencies, and web server installation.
SharkCluster makes this process easier by letting you use a guided deployment workflow to set up OJS and provision a server. Without having to manually prepare each server component, you can select your infrastructure, select the OJS version, set up the database and PHP environment, and launch the installation.
From setting up your server to finishing the initial OJS installation, this guide will walk you through the process of deploying Open Journal Systems on SharkCluster.
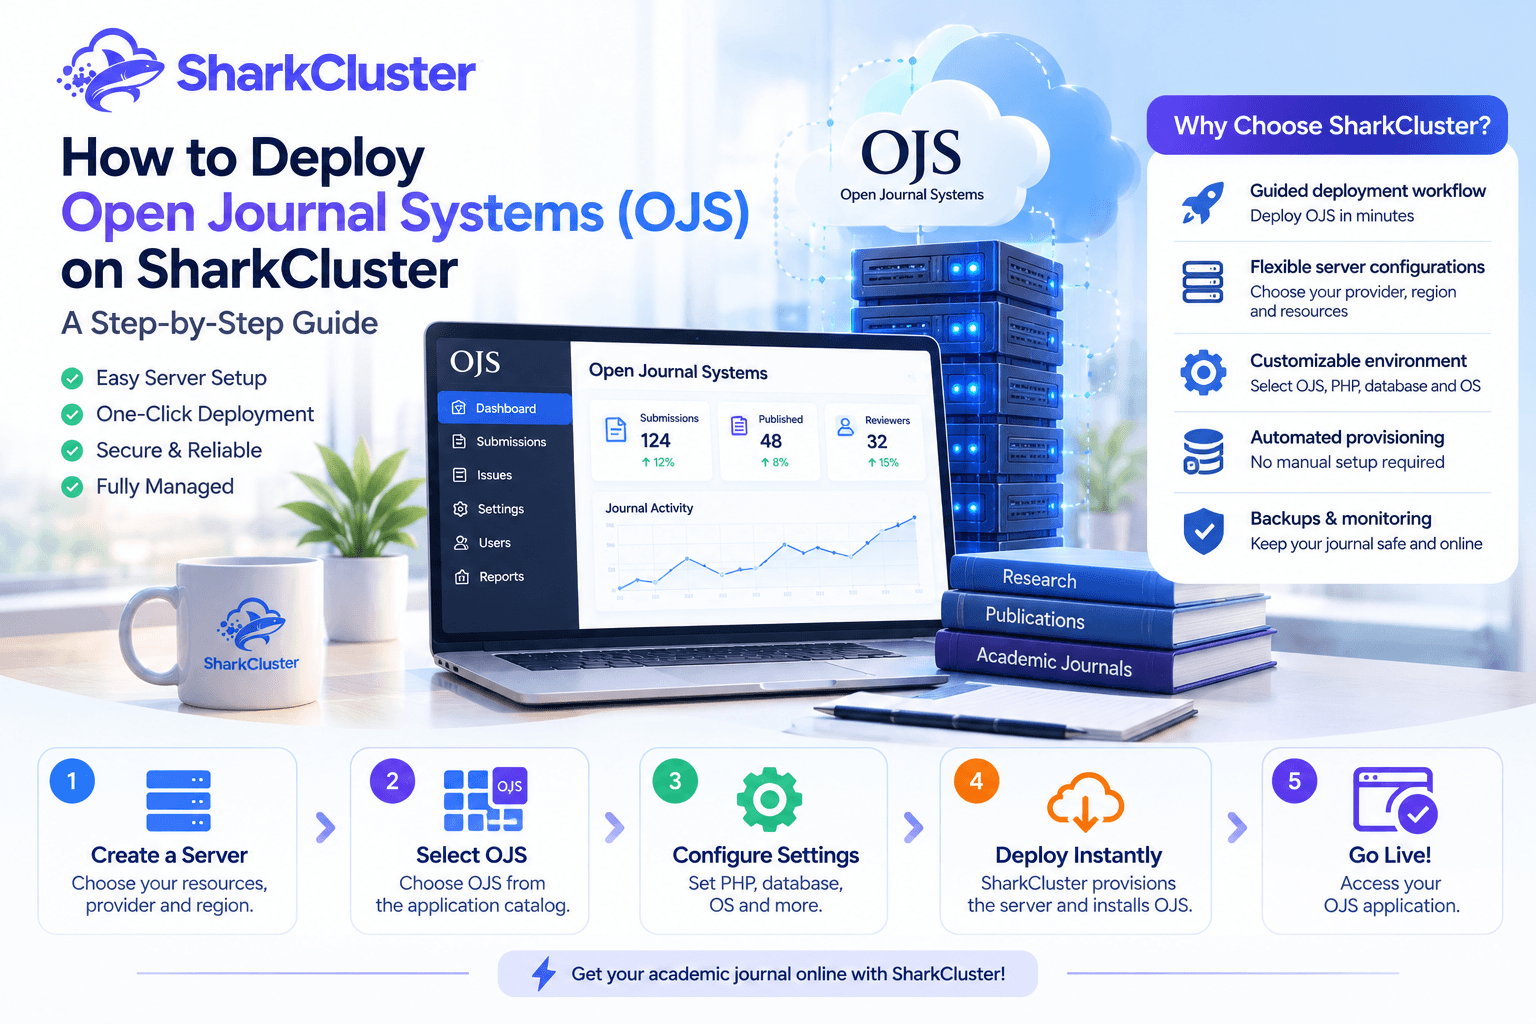
Why should OJS be deployed with SharkCluster?
More than just installing publishing software is required to establish an academic journal. In addition, you need a server, a database, a software environment that works with the application, and a reliable way to manage the application after it is deployed. SharkCluster brings these steps together in a guided server creation and application deployment workflow.
Open Journal Systems ought to be implemented on SharkCluster for the following reasons:
- Simplified application deployment: instead of manually preparing each server component, select OJS from the application catalog and configure the deployment through a guided interface.
- Flexible server configurations: Based on the requirements of your journal and anticipated traffic, select a cloud provider, region, CPU, RAM, and storage.
- Configurable software environment: Choose an OJS, PHP, database, operating system, and web server based on the planned deployment.
- Automated server provisioning: SharkCluster will set up the server environment and deploy the application, and the provisioning screen lets you keep track of how the installation is going. Applications management tools: From the SharkCluster dashboard, access application data, database credentials, the web console, file management, and other management options.
- Options for backup: To protect journal data and application files, set up automated backups. Verify that the retention settings and backup schedule meet your recovery needs.
- Server monitoring: As your journal grows, activate the monitoring options that are available to monitor server performance and identify potential resource issues.
- Room to Scale: As the number of journal submissions, uploaded manuscripts, and readers grows, check the resources on your server and make any necessary infrastructure adjustments.
SharkCluster provides a centralized workflow for setting up and managing the infrastructure behind your OJS application in order to launch a brand-new academic journal or prepare a platform for scholarly publishing.
Check that the OJS version you choose is compatible with the PHP version, database, and operating system before deploying.
Step 1: Create an OJS Server on SharkCluster
The first step is to choose the infrastructure and server resources for your OJS application.
After logging in to SharkCluster, go to the "Servers" section. Start the process of building the server and set the options up to meet the needs of your application.
Select the resources of your server
Choose a server plan and RAM configuration that are appropriate for the anticipated workload. The number of journals, concurrent users, uploaded documents, and editorial activity all have an impact on the required resources.
This walkthrough's chosen configuration includes:
- Cloud provider: DigitalOcean
- Region: Bangalore 1
- Memory: 2 GB RAM
- CPU: 1 vCPU
- Storage: 50 GB SSD
- Storage type: Standard SSD
These values represent the example deployment shown in SharkCluster. They are not universal minimum requirements for every OJS installation. A production journal with substantial traffic or a large document archive may need additional resources.
Choose your storage and provider preferences
Using provider preferences, storage type preferences, and region preferences, SharkCluster lets you compare the available infrastructure options.
Based on your target audience and application requirements, select a region. By selecting an appropriate Indian region, a journal that primarily serves readers in India may benefit from lowering network latency.
Before moving forward, you can also look over the plans and storage options that are available.
Select the application technology
Open the CMS & E-commerce category in Select technology of application and select OJS.
Review the available server plans and select the configuration you want to use. Move on to the following step when all of the necessary settings have been set up.
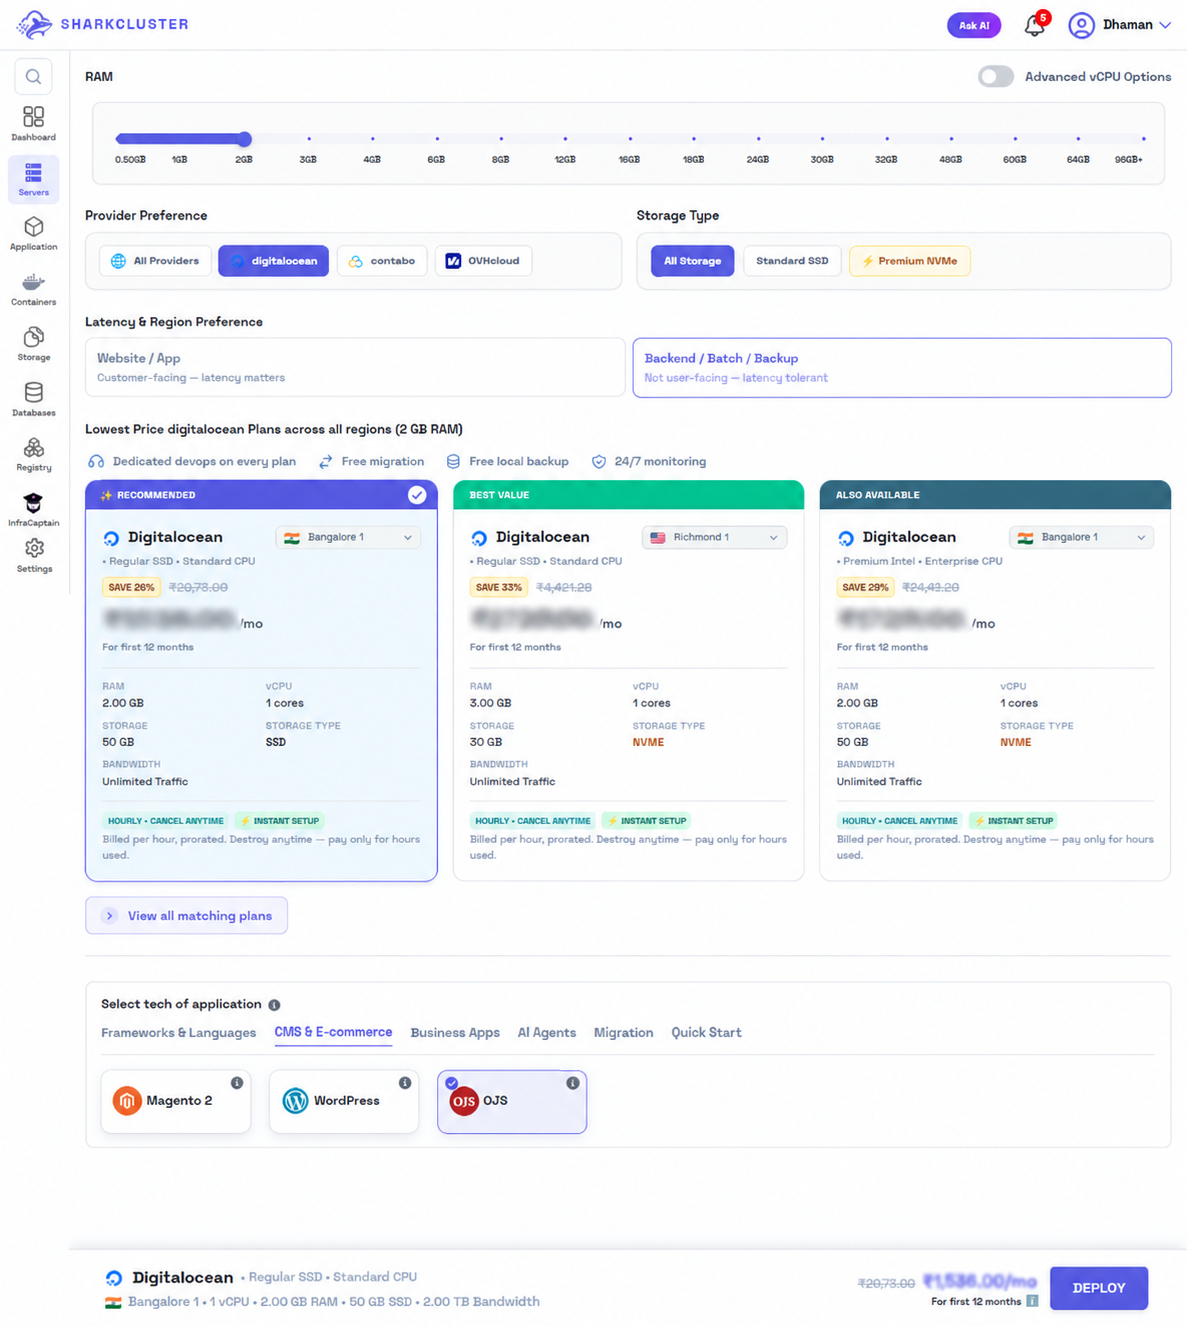
Creating an OJS server and selecting the infrastructure and application technology in SharkCluster.
Step 2: Configure the OJS Application and Server
After selecting a server plan, SharkCluster displays the application and server configuration form. Here, select the software environment for OJS and enter the application's name.
Mention the names of the server and the application
Give people a name for the server and the application that they can easily remember. In this example, the application is named .
If you manage multiple environments or journals on the same account, choose names that are simple to recognize in the future.
Pick the OJS version to use
In the deployment interface, select the OJS version that is available for download.
The downloaded release is listed as OJS 3.3.0.7 on the installation screen, whereas the example configuration uses OJS 3.3.0.
Verify the supported versions and compatibility requirements for your chosen OJS release prior to deploying a production journal. Do not choose a version based solely on the interface's assertion that it is the most recent.
Select the version of PHP
OJS calls for PHP, and the right version varies from release to release. PHP 8.0 is selected for the SharkCluster example configuration.
Before deploying, verify that the chosen OJS version meets the requirements. Choose a PHP version that is compatible rather than assuming that the same configuration applies if you use a different OJS release.
Set the database up
Choose the database engine that your selected OJS release supports. The example makes use of MySQL.
In addition, SharkCluster offers MariaDB and PostgreSQL as database options in the configuration interface. The interface's availability does not guarantee compatibility with all OJS versions. Before proceeding, confirm that your release is compatible with the selected database engine and its version.
Select the method of installation.
SharkCluster presents three installation methods:
- New Installation: To begin, install OJS from scratch.
- Deploy from a Git Repo: A Git repository is used to deploy an existing project.
- Upload ZIP: Upload a ZIP file containing your current application's source code.
Select Fresh Installation because the goal of this walkthrough is to set up a new journal platform.
Select the operating system and web server
Select the application's web server and operating system.
The example uses:
- Operating system: Ubuntu 24.04.5 LTS
- Web server: Apache
Before proceeding, confirm that the PHP, OJS, and operating system versions you have selected are compatible. In order to serve the application, the web server must also be properly configured.
Select an SSH key
From your account's options, either select an existing SSH key, generate a new key, or add a public key.
A secure way to access the server for administration and troubleshooting is provided by an SSH key. Only the server's authorized users can see your private key.
Configure monitoring and backups
SharkCluster provides an automated application backup option in the server creation workflow.
Automated backups are enabled with a weekly schedule in the example. For weekly backups, the configuration specifies a Monday at 02:00 AM local time and a 28-day retention period.
If its schedule and retention settings better suit your recovery requirements, you can also select the daily backup option.
Server monitoring is available as a separate option. By activating monitoring, you can monitor resource consumption and identify server performance issues.
Review the backup schedule, monitoring settings, and applicable fees prior to requesting the server.
After examining the application, server, security, and backup settings, send the server request and review the summary.
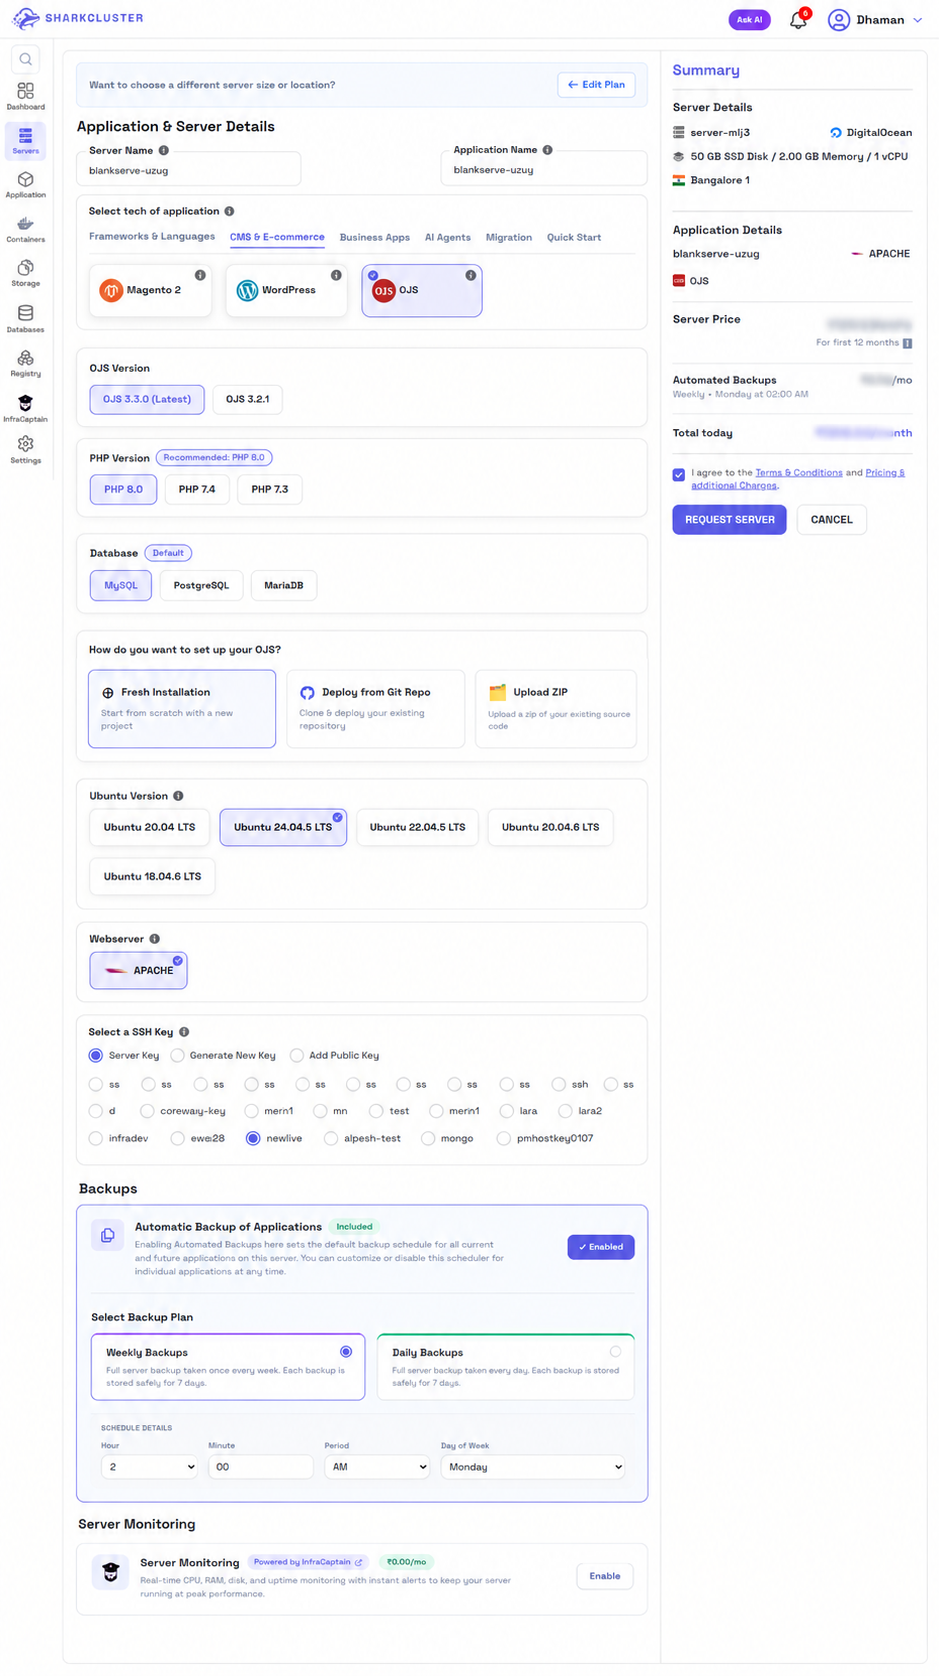
Configuring the OJS version, PHP, database, installation method, operating system, SSH access, backups, and monitoring.
Step 3: Wait for the OJS Server Provisioning Process
After receiving the request, SharkCluster begins preparing the server and application environment.
A log of the setup stages and an indicator of the installation's progress are displayed on the provisioning screen. In the example, the estimated installation time is approximately 5–15 minutes, although actual completion time may vary.
The visible provisioning stages include:
- Starting the server setup process: The server setup procedure starts.
- Installing software and system updates: The operating system packages and dependencies that are required are prepared.
- Configuring the database server: The database environment is configured.
- Setting up the web server: The selected web server is prepared.
- Configuring PHP and environment tools: The PHP environment and supporting tools are configured.
- Deploying the application: The OJS application deployment process runs.
The image depicts the installation at 85%, with application deployment still in process and earlier stages completed.
Wait until the platform reports that the application is ready and provisioning is finished. Don't take an intermediate percentage to mean that the journal can be accessed.
Before attempting another deployment, review the provisioning log and investigate the failed stage if the process appears to be stuck or reports an error.
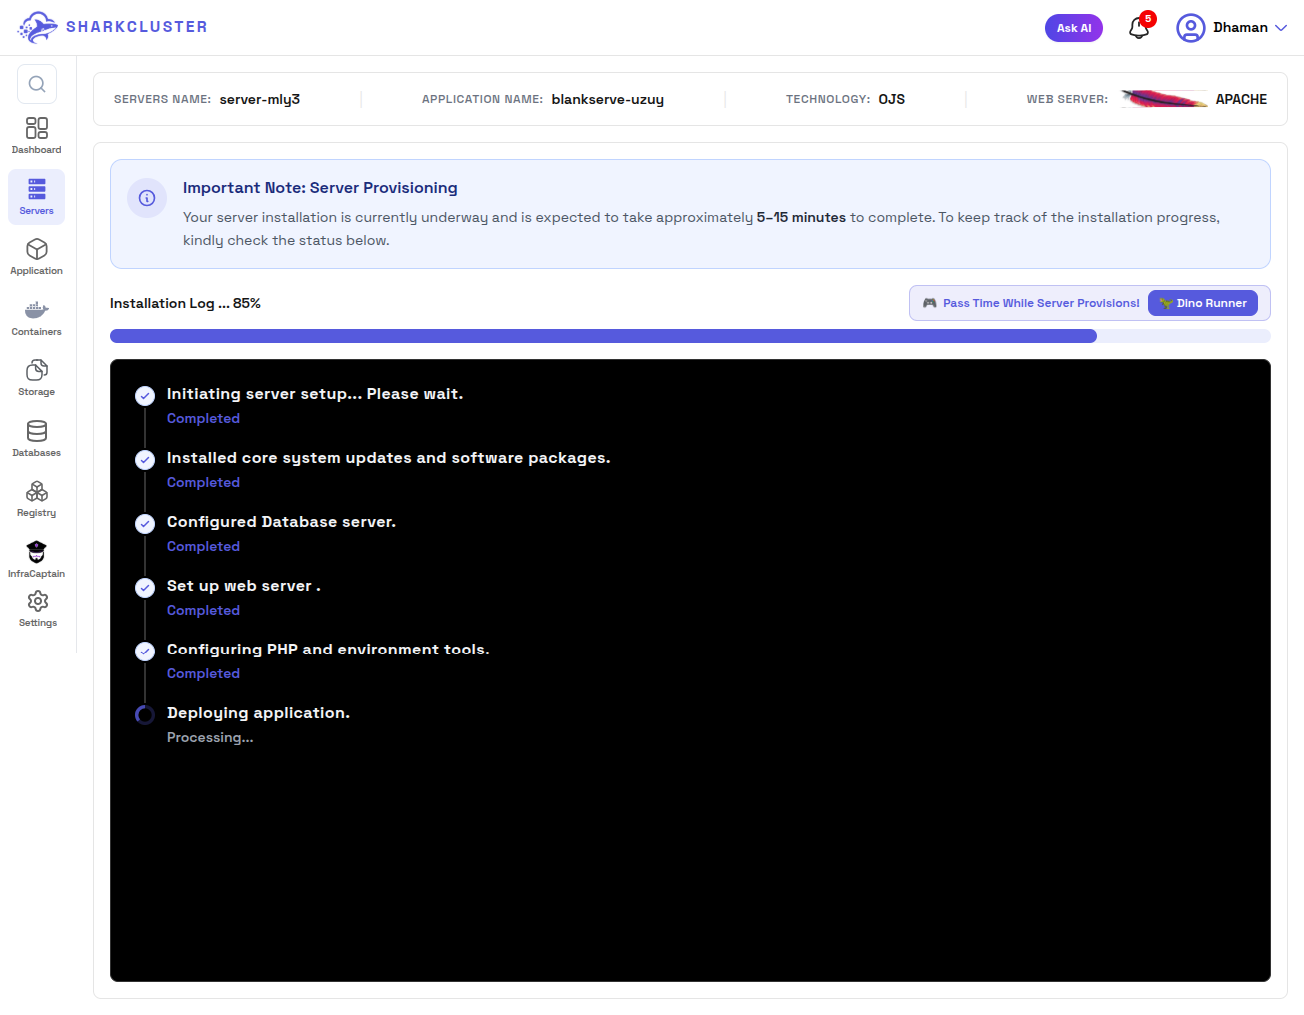
SharkCluster's server provisioning screen showing the installation log and deployment progress.
Step 4: Open the OJS Application Details
Open the brand-new OJS application in SharkCluster by going to the Servers or Application sections after provisioning is finished.
The application overview contains useful details about the deployment as well as management shortcuts.
Review the application URL
The application URL is displayed by SharkCluster, which can be used to open a browser and access the OJS installation.
The URL of the deployed application in this example is:
http://servermly3-blankserve-uzuy.sharkcluster.com
The application's details and the assigned server address are also displayed in the application overview.
Check the application configuration
The fields on the application details screen include:
- Database type: The configured database engine.
- Document root: The directory where the application is served by the web server.
- Application type: OJS.
- Application port: The configured port, where applicable.
If you need to troubleshoot application access or check the deployment configuration, look at these values.
Review database credentials
The name, username, and password for the database are also provided in the overview.
When connecting to a database management tool or looking into database-related errors, these details are helpful. Credentials should only be copied when absolutely necessary and kept safe, and they should never be published in images, blog posts, or other public repositories.
When supported, SharkCluster provides a database manager shortcut and the option to import a database. When managing an existing journal or restoring a database backup, these tools can be helpful.
From the application management interface, you can also create additional SSH or SFTP users, manage folder permissions, and examine the master user's details.
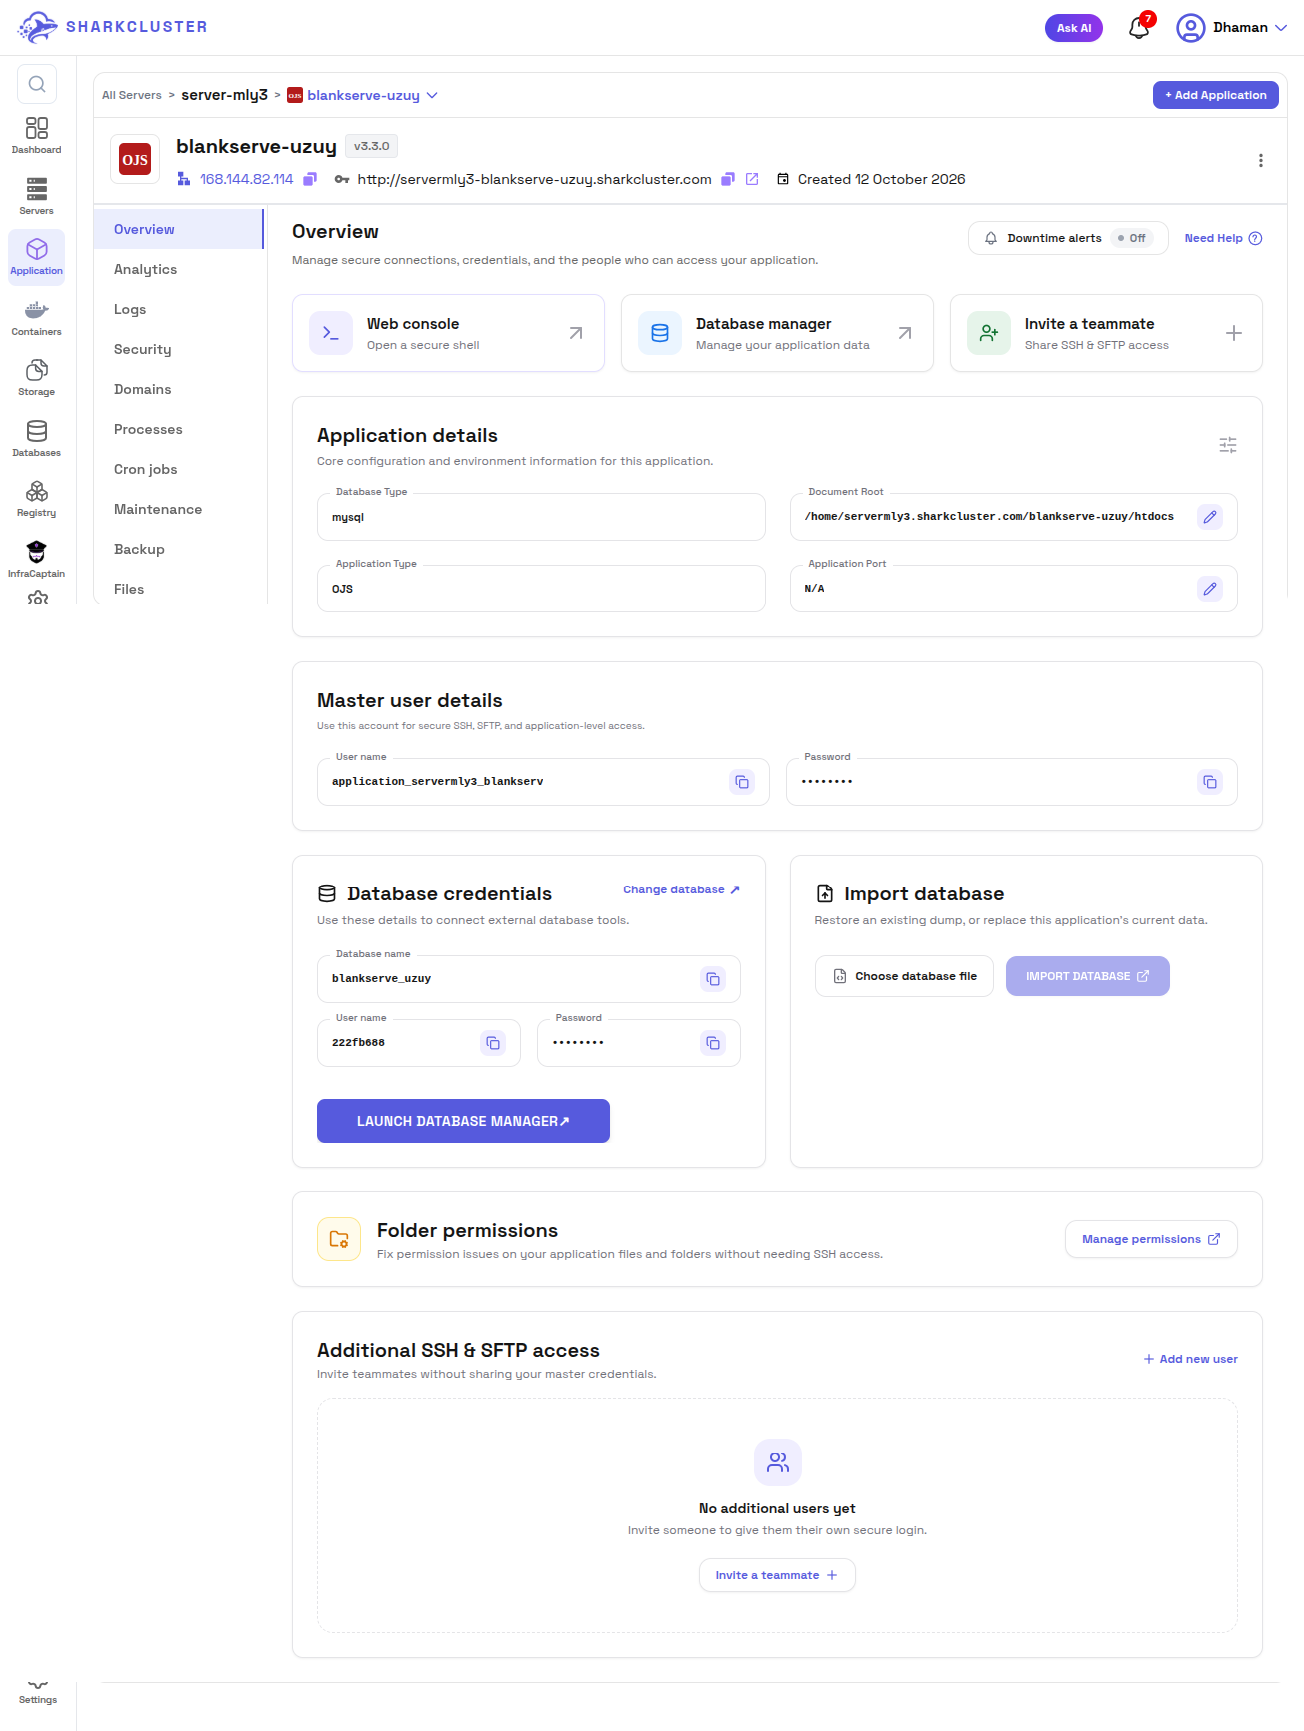
The OJS application overview in SharkCluster, including the application URL, configuration, database credentials, and management options.
Step 5: Complete the OJS Installation in Your Browser
Open the URL of the application in your browser once the server has been provisioned.
You will find instructions on how to set up the journal management environment on the OJS installation page.
The installation form is shown on the example installation screen, which identifies OJS version 3.3.0.7.
Establish the administrator account settings
Enter the required information to create the initial administrator account:
- Username: Select a distinctive administrative username.
- Password: Make a password that is strong.
- Repetition of the password: Confirm the password.
- Email: Provide an accessible email address.
The OJS installation is easily accessible to the administrator account. Choose a strong, one-of-a-kind password to safeguard your account's data.
Select locale settings
Select the journal's primary location. The installation's default language is determined by the primary locale.
Additionally, OJS permits you to select additional supported locales. Depending on your editorial needs, select the appropriate options if your journal publishes in more than one language.
Character-set settings are also available on the installation screen. As long as the environment is set up to support it, UTF-8 is typically suitable for content in journals that are published in more than one language.
Set up storage for files.
OJS requires a location for uploaded files, including manuscript documents and other journal-related files.
The example shows a file directory under the application's server path:
/home/servermly3.sharkcluster.com/blankserve-uzuy/htdocs
Make use of the directory that has been set up for your deployment rather than blindly copying the example path.
It is necessary for the upload directory to be present, to have the appropriate permissions, and to be shielded from direct public web access. The storage location of uploaded manuscript files is especially important because they may contain confidential reviewer information or unpublished research.
Establish the connection to the database
Fill in the details necessary for the installer to connect to the database.
There are fields on the installation form for:
- Database driver: Select the appropriate driver.
- Host: Enter the database host.
- Username: Type in the username for the database.
- Password: Enter the password for the database.
- Database name: Enter the database assigned to OJS.
For a database hosted on the same server, the host may be , as shown in the example. Make use of the host and credentials that your deployment configuration provides.
Make sure the driver you chose is compatible with PHP, that the database user has the installation-specific permissions, and that the database exists.
Configure OAI settings
An Open Archives Initiative (OAI) repository identifier is also provided by the installer.
Metadata can be extracted from scholarly journals and repositories using OAI-PMH-compatible services. The identifier ought to be appropriate for the journal's long-term identity and unique to the installation.
Examine the installation page's options for the associated beacon. Only enable the options that are suitable for your journal and privacy needs.
Get the installation done
Verify the settings for the repository, database connection, locale, file directory, and administrator account prior to proceeding.
To begin the installation, select Install Open Journal Systems from the menu.
Follow the on-screen instructions to continue setting up your journal if the installation went well. Before retrying, verify the database credentials, PHP extensions, version compatibility, directory permissions, and PHP extensions in the event of an error.
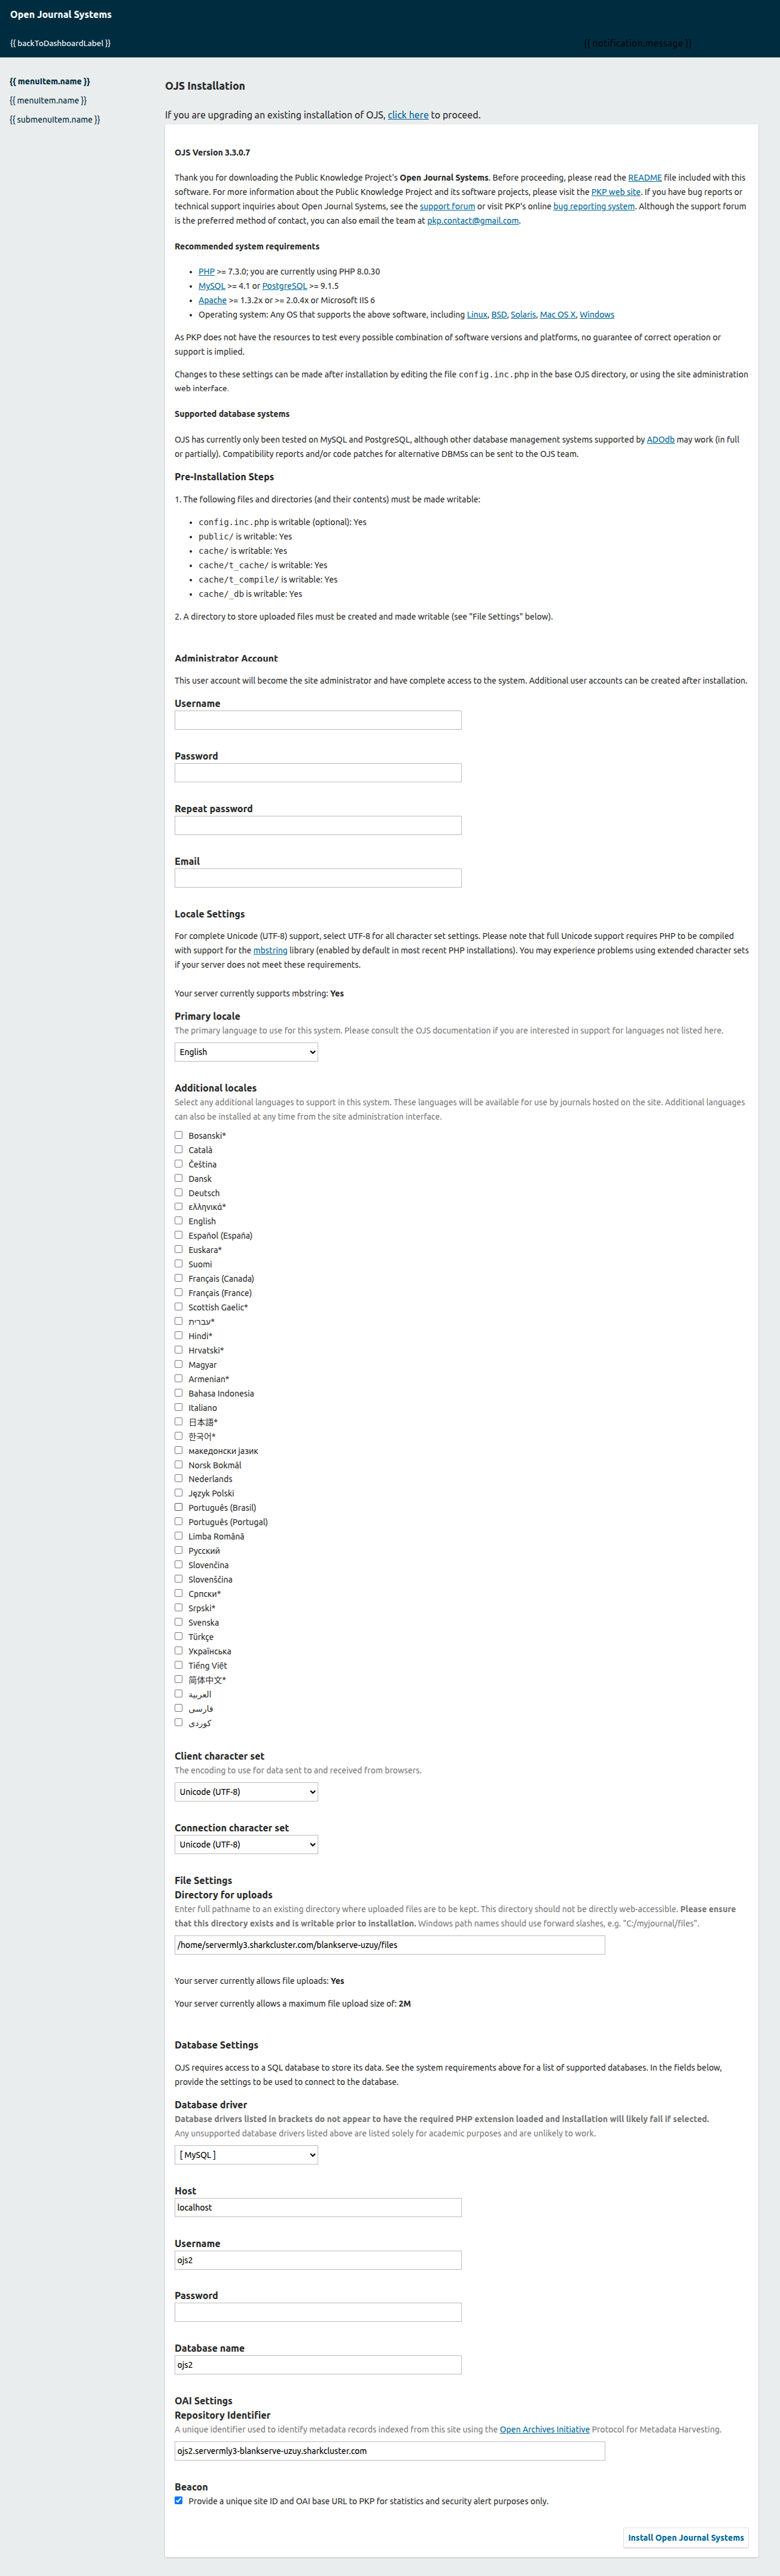
The OJS installation page, where you configure the administrator account, locale, file directory, database connection, and repository settings.
Step 6: Verify Your OJS Deployment
Open the URL of your deployed application following the completion of the installation:
http://servermly3-blankserve-uzuy.sharkcluster.com
Log into the application using the administrator account you created during installation to check that it loads correctly.
Before making actual submissions to the journal, check the following:
- Administrator access: Confirm that you can sign in and access the administration interface.
- Journal configuration: Select the journal's name, title, publishing information, and editorial guidelines.
- User roles: Define the roles that authors, editors, reviewers, and other journal participants ought to play.
- Submission workflow: Review the settings for submission and peer review prior to inviting authors.
- Email delivery: Set up and test outgoing email to send submission notifications and editorial messages.
- Uploading files: Perform a test upload of the manuscript to ensure that the files are stored in the intended protected directory.
- Database connectivity: Make sure that the application data and journal settings are saved correctly.
- Backups Verify that scheduled backups are enabled and that your recovery procedure is comprehended.
- HTTPS: Before publishing the journal to the public, establish a valid TLS certificate and ensure that it is served securely.
The example URL uses HTTP. Treat it as the address of the demonstrated deployment rather than confirmation that HTTPS has already been configured. Utilizing HTTPS and, if necessary, a custom domain, secure the application for a production journal.
How to Use SharkCluster to Run OJS Best Practices
Installation success is only the beginning. Additionally, a dependable recovery strategy, sensible access controls, and regular maintenance are necessary for a journal platform.
Keep software up to date and compatible. Before updating PHP, the operating system, or database software, check the OJS release requirements. Before implementing significant updates to a live journal, test them.
Prevent the publication of manuscripts. Make sure that uploaded documents cannot be accessed through unintentional public URLs by using strong passwords and secure SSH credentials.
Verify your backups. A backup is only useful if it can be recovered. Test recovery on a regular basis in a different setting to ensure that the backup process covers the database and necessary application files.
Keep an eye on how resources are used. Server demands may rise as a result of the creation of PDFs, the uploading of manuscripts, editorial activity, and an increase in traffic. Monitor the CPU, memory, storage, and application performance as usage grows.
Before the launch, configure email. Important editorial workflows in OJS rely on email. Before inviting authors and reviewers, test notification delivery.
Use HTTPS and a production domain. A stable domain and valid TLS certificate help provide a secure, professional experience for researchers and journal participants.
At long last
Journal administrators are given a step-by-step guide for setting up the server, configuring the application environment, and starting the initial Open Journal Systems installation when Open Journal Systems is installed on SharkCluster.
You can establish the foundation for an online scholarly journal without manually completing each infrastructure setup step by following the workflow, which includes selecting a server plan, configuring PHP and the database, and finishing the browser-based installer.
Focus on journal configuration, editorial roles, email delivery, secure file storage, monitoring, and tested backups once OJS is up and running. The platform is better prepared for the ongoing work of managing submissions and publishing academic research as a result of these steps.
Are you prepared to use your journal platform? Investigate SharkCluster and establish the server environment for your subsequent OJS project.
Run this on your own VPS
Deploy servers and applications on infrastructure you own, managed from one panel — backups, caching, firewall and monitoring included.