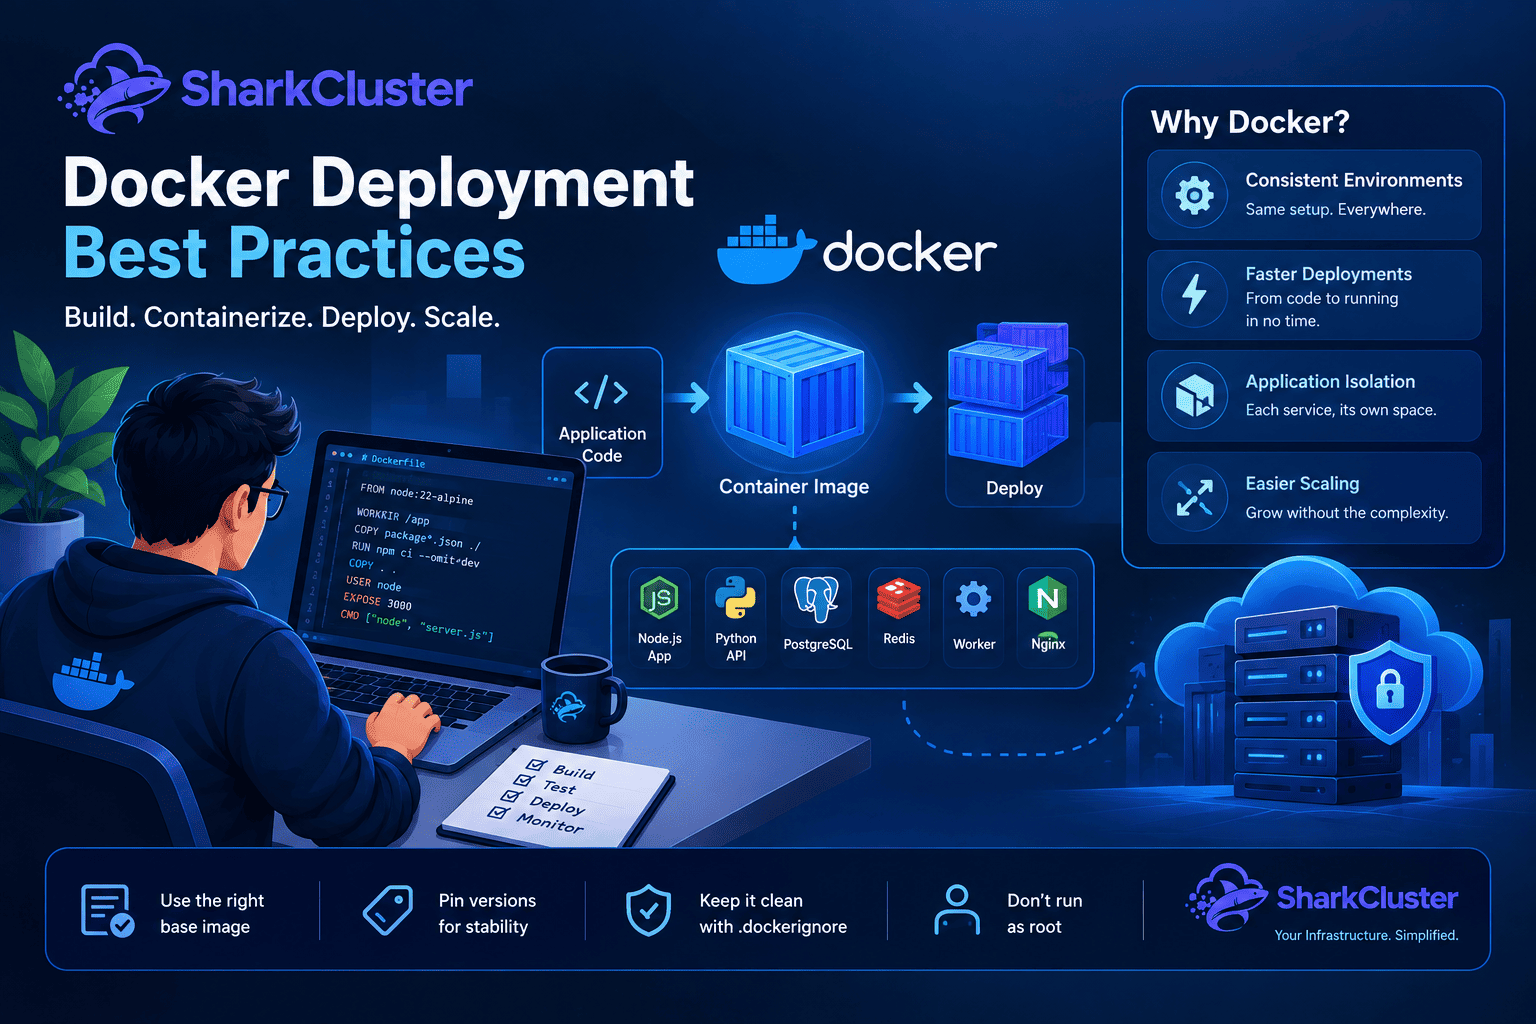
Docker deployment has become a practical way for development teams to package applications with their dependencies and run them consistently across environments. Teams can define an application's runtime environment in code and deploy it as a portable container rather than manually configuring each server.
This strategy has the potential to make deployments easier to replicate, reduce environment-related inconsistencies, and simplify application delivery for developers and infrastructure teams.
However, putting an application inside a Docker container is only part of the process. Production Docker deployments also require meticulous image design, resource management, networking, persistent storage, security, monitoring, and operational planning.
Docker packages an application and its required dependencies into a container image. Then, consistent application environments for development, staging, and production can be created using that image.
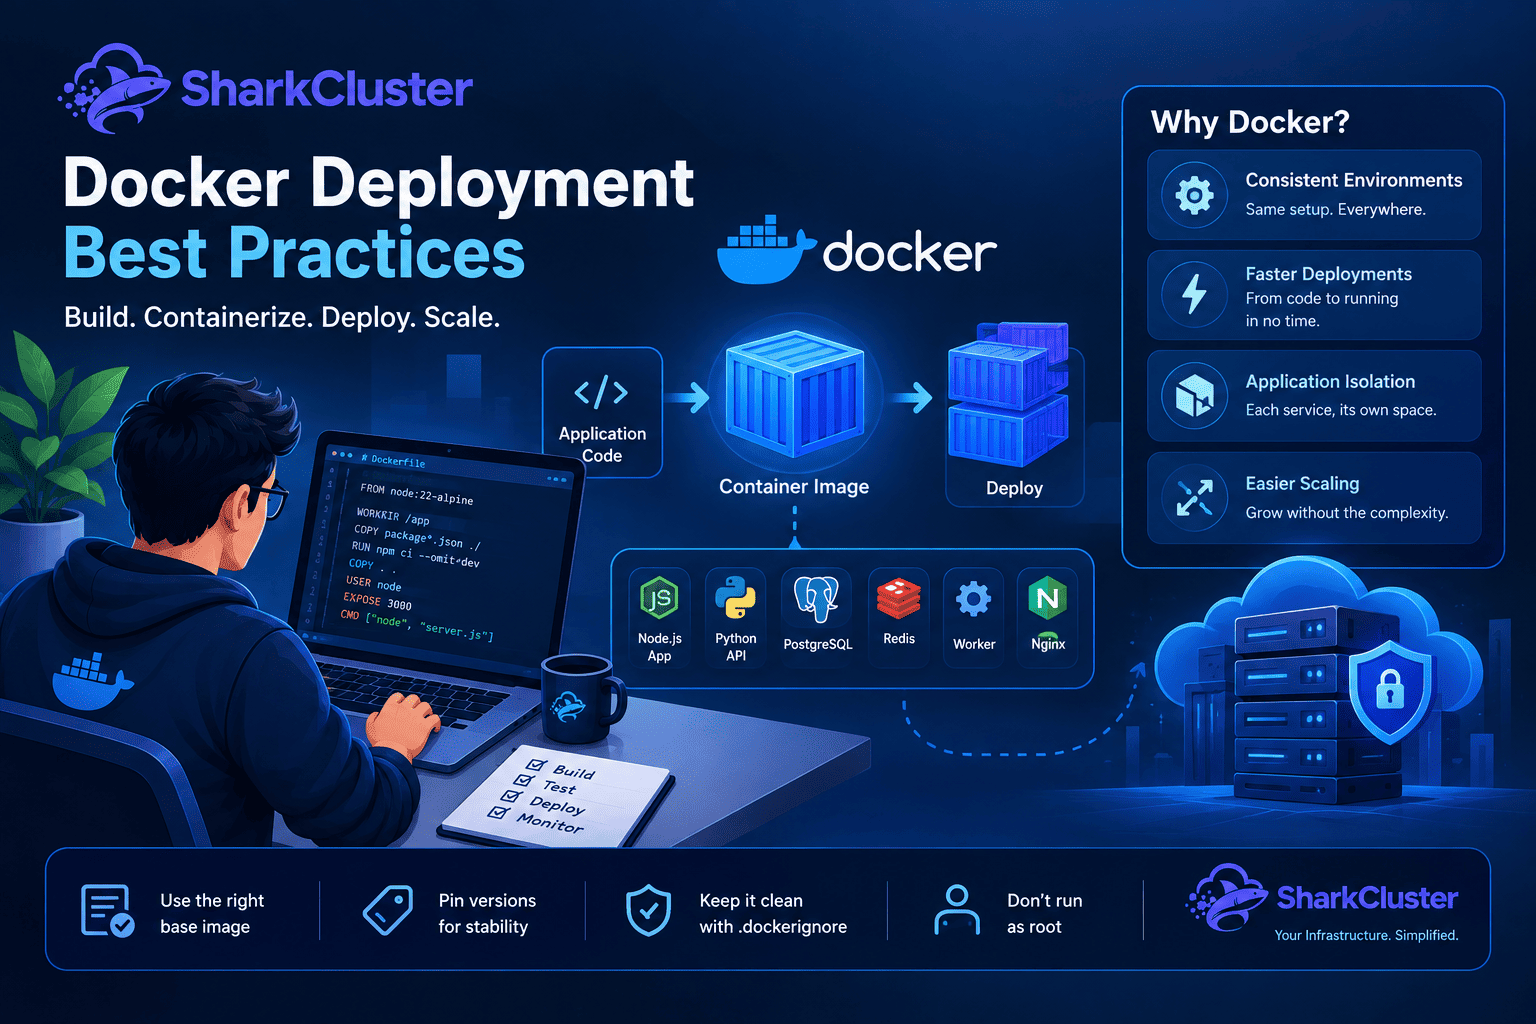
1. Docker Benefits Overview
That image can then be used to create consistent application environments across development, staging, and production.
Consistent environments
One of the common deployment problems is the difference between development and production environments.
An application may function properly on the developer's machine but fail upon deployment due to:
- Operating system packages
- Runtime versions
- Installed libraries
- Environment variables
- System dependencies
- Application configuration
By defining the application environment as part of the image, Docker contributes to the reduction of these differences.
Faster application deployment
Once a Docker image has been created, deployment becomes primarily a matter of pulling the image and starting the required containers.
When compared to manually installing application dependencies on each server, this may make deployments more predictable.
Application isolation
Containers provide process and filesystem isolation between applications.
A server, for instance, can run separate containers for:
- A Node.js application
- A Python API
- PostgreSQL
- Redis
- A background worker
- Nginx
Each service can maintain its own dependencies without requiring every dependency to be installed directly on the host system.
Easier scaling
Containerized applications can also be replicated when additional capacity is required.
Teams can run additional instances of the same container image behind a reverse proxy or load balancer rather than manually altering the application environment.
2. Creating a Production-Ready Dockerfile
Then, consistent application environments for development, staging, and production can be created using that image
Take a look at an easy Node.js application:
FROM node:22-alpine

WORKDIR /app

COPY package*.json ./

RUN npm ci --omit=dev

COPY . .

EXPOSE 3000

CMD ["node", "server.js"]
Although production deployments should take several additional practices into consideration, this is a fundamental starting point.
Use an appropriate base image
Use a smaller general-purpose image when a smaller runtime image is sufficient.
Alpine-based images, for instance, may help applications that are compatible with Alpine Linux by producing smaller image sizes.
However, image size should not be the only consideration. With Debian-based images, some native dependencies or applications may function more consistently.
Pin important versions
Avoid relying blindly on floating tags such as:
FROM node:1.0.0A new upstream release could change the runtime environment unexpectedly.
Instead, define an intentional version:
FROM node:22-alpineFor stricter reproducibility, teams can also pin image digests.
Use .dockerignore
A .dockerignore file prevents the copying of unnecessary files into the image.
For instance:
node_modules
.git
.env
npm-debug.log
Dockerfile
docker-compose.yml
This helps keep sensitive or unnecessary files from entering the image and reduces the size of the build context.
Run containers as a non-root user
Use a non-root user to run the application whenever possible.
For instance:
FROM node:22-alpine

WORKDIR /app

COPY package*.json ./

RUN npm ci --omit=dev

COPY --chown=node:node . .

USER node

EXPOSE 3000

CMD ["node", "server.js"]
Running with reduced privileges limits the impact of an application-level compromise.
3. Image Optimization Tips
A smaller and cleaner Docker image can improve deployment speed, storage usage, and operational efficiency.
Build in multiple stages
Runtime and build stages can be used separately by applications that require compilation.
For instance:
FROM node:22-alpine AS builder

WORKDIR /app

COPY package*.json ./

RUN npm ci

COPY . .

RUN npm run build

FROM node:22-alpine

WORKDIR /app

COPY package*.json ./

RUN npm ci --omit=dev

COPY --from=builder /app/dist ./dist

EXPOSE 3000

CMD ["node", "dist/server.js"]
The final runtime image does not need to contain the build environment.
Keep dependencies clean
Unless the application requires them at runtime, development dependencies should not typically be included in production containers.
Applications using Node.js:
npm ci --omit=devTeams can similarly distinguish between runtime dependencies and build-time requirements for Python applications.
Build only what you need
Avoid copying source directories, test artifacts, local configuration, Git metadata, and development files into the final image. A carefully configured .dockerignore can make a significant difference.
Reuse Docker layers
Docker caches image layers. Structure the Dockerfile so that when the application's source code changes, dependency installation can be cached. By copying package.json first, for instance, Docker can reuse the dependency layer when only the application code changes.
4. Deploying on SharkCluster: Step-by-Step
A production Docker deployment should separate infrastructure provisioning from application configuration. SharkCluster can serve as the infrastructure management layer, while Docker handles application packaging and runtime isolation.
Step 1: Provision your server
Start by creating or selecting a server suitable for the application workload.
Consider:
- CPU requirements
- Memory requirements
- Storage capacity
- Expected traffic
- Database requirements
- Backup requirements
- Network requirements
Avoid selecting infrastructure based only on the application's initial resource usage. In production, workloads should be able to handle the expected growth and normal traffic.
Step 2: Prepare the Docker environment
Once the server is available, make sure Docker is installed and operational.
Make sure the installation is correct using:
docker --versionThen check the daemon:
sudo systemctl status dockerAdditionally, you can check that containers can run:
docker run --rm hello-worldStep 3: Retrieve or upload the application
Your application can be obtained from a Git repository, deployment artifact, or another supported source.
For a workflow based on Git:
git clone <repository-url>
cd your-application
Keep production secrets outside the repository.
Step 4: Set environment variables
Do not hard-code passwords, API keys, database credentials, or private tokens into the Dockerfile. Instead, provide them through environment configuration.
For example:
NODE_ENV=production
PORT=3000
DATABASE_URL=your-production-database-url
Production secrets shouldn't be committed to Git and should be carefully managed.
Step 5: Build the Docker image
Build the application image:
docker build -t my-application:1.0.0 .Check the image:
docker imagesStep 6: Start the container
Run the application:
docker run -d \
  --name my-application \
  --publish 127.0.0.1:3000:3000 \
  --restart unless-stopped \
  my-application:1.0.0
The --restart unless-stopped policy helps bring the container back after a Docker or server restart.
Step 7: Configure the application domain
Production applications normally should not expose application ports directly to the public internet. Instead, put a reverse proxy like Nginx in front of the application.
A typical architecture looks like:
Internet
 |
 v
Domain
 |
 v
Nginx / Reverse Proxy
 |
 v
Docker Container
 |
 v
Application
This allows HTTPS termination, domain routing, request handling, and other web-server responsibilities to remain separate from the application container.
Step 8: Verify the deployment
After deployment, check:
docker psThen inspect application logs:
docker logs my-applicationTest the application locally:
curl http://127.0.0.1:3000Finally, verify the application through its configured domain.
5. Container Orchestration
Running a single container manually may be sufficient for a small application. As the application becomes more complex, multiple services often need to work together.
A typical application stack might contain:
Nginx
 |
 +-- Web Application
 |
 +-- API
 |
 +-- Worker
 |
 +-- Redis
 |
 +-- Database
With Docker Compose, managing multiple related containers can be made easier.
A basic example:
services:
  app:
    build: .
    restart: unless-stopped
    ports:
      - "3000:3000"
    environment:
      NODE_ENV: production
  redis:
    image: redis:7
    restart: unless-stopped
Then start the stack with:
docker compose up -dCheck the running services:
docker compose psAutomated scheduling, service discovery, rolling deployments, and horizontal scaling are just a few of the additional features that can be provided by dedicated container orchestration platforms for larger environments.
The basic idea is to select orchestration based on how complex the application is rather than installing unnecessary infrastructure for a straightforward workload.
6. Monitoring Docker Containers
A Docker deployment is not finished until the container starts up successfully. In production, workloads necessitate constant monitoring.
Start with the built-in commands of Docker:
docker psFor resource usage:
docker statsFor logs:
docker logs my-applicationFor recent container events:
docker eventsMonitor metrics such as:
- CPU utilization
- Memory consumption
- Container restarts
- Disk usage
- Network traffic
- Application response time
- HTTP errors
- Container health
- Database performance
SharkCluster can provide a centralized operational workflow for managing the underlying server environment, while container-level monitoring should continue to track the health of individual workloads.
Add health checks
Docker health checks can help distinguish between a running process and a functioning application.
For example:
HEALTHCHECK --interval=30s --timeout=5s \
  CMD wget --spider -q http://localhost:3000/health || exit 1
A container process can technically continue to run even when the application itself is unable to fulfill requests. Health checks help expose that difference.
7. Common Docker Deployment Issues
Container starts and immediately stops
Check the logs:
docker logs my-applicationCommon causes include:
- Application startup errors
- Missing environment variables
- Incorrect startup commands
- Missing dependencies
- Incorrect file paths
Port already in use
If Docker reports that a port is already allocated, identify the process using it:
sudo ss -ltnp | grep :3000Then either stop the conflicting service or map the container to another host port.
Application works inside Docker but not externally
Check:
docker psConfirm that the port is published correctly:
docker port my-applicationAlso verify firewall rules, reverse-proxy configuration, DNS, and HTTPS settings.
Container keeps restarting
Inspect:
docker ps -a
docker logs my-application
A restart loop is usually a symptom rather than the underlying problem. Common causes include application startup failures, incorrect health checks, configuration errors, and inaccessible dependencies.
Data disappears after container recreation
Containers are made to be interchangeable. Application data that needs to survive container removal should be stored using persistent volumes or an external storage system.
For instance:
volumes:
  app_data:

services:
  database:
    image: postgres:16
    volumes:
      - app_data:/var/lib/postgresql/data
Backups should still be maintained separately. A Docker volume should not be treated as a complete backup strategy.
8. Build a Reliable Docker Deployment Workflow with SharkCluster
Docker provides the application packaging layer, while infrastructure management provides the environment where those containers operate.
A reliable deployment workflow should therefore cover the complete lifecycle:
Develop
 ↓
Build Docker Image
 ↓
Test
 ↓
Provision Infrastructure
 ↓
Deploy Container
 ↓
Configure Domain & HTTPS
 ↓
Monitor
 ↓
Backup
 ↓
Update & Roll Back
SharkCluster makes it easier to integrate server provisioning and infrastructure management into a centralized workflow. This frees up development teams to focus on their applications rather than manually setting up servers multiple times.
Keep the fundamentals the same for production Docker deployments:
- Build small and reproducible images.
- Separate build and runtime environments.
- Never embed production secrets in images.
- Run containers with appropriate privileges.
- Persist important data outside disposable containers.
- Monitor both containers and the underlying server.
- Use health checks and restart policies thoughtfully.
- Put production applications behind a properly configured reverse proxy.
- Maintain backups and a tested recovery process.
- Document deployment and rollback procedures.
Conclusion
Docker deployment can make modern application delivery more consistent and repeatable, but production reliability is dependent on more than just creating a container.
A strong Docker deployment combines optimized images, secure configuration, persistent storage, networking, monitoring, backups, and an infrastructure workflow designed for ongoing operations.
With SharkCluster, teams can manage the server environment around their containerized applications while maintaining a deployment process that is easier to standardize and operate.
Whether you are deploying a Node.js API, Python service, Laravel application, MERN stack, or a multi-container application, treating Docker deployment as a complete operational workflow—not simply a docker run command—provides a stronger foundation for production workloads.
Deploy Your Docker Workloads with SharkCluster
Ready to move beyond manual server configuration?
Use SharkCluster to provision and manage your infrastructure, then deploy your Dockerized applications in a consistent production environment.
Build your application once. Deploy it with confidence. Manage the infrastructure from one place with SharkCluster.
Run this on your own VPS
Deploy servers and applications on infrastructure you own, managed from one panel — backups, caching, firewall and monitoring included.